When you see three Command Prompt (CMD) windows related to system32 opening upon logging into Windows 10, it typically indicates that there are tasks scheduled to run at login which execute commands using the Command Prompt.
These tasks could be part of a legitimate software’s operations, updates, or maintenance scripts. However, they could also be indicative of unwanted software or malware that has set itself to run at startup.
This post explains how you can investigate and potentially resolve this issue.
Check Startup Programs
Log in using an administrator account and press ‘Ctrl + Shift + Esc‘ to open the Task Manager.
Click on the ‘Startup‘ tab to see if any programs listed there might be responsible for opening these CMD windows.
You can disable any suspicious or unnecessary items by right-clicking them and selecting ‘Disable‘.
Task Scheduler
Click on the Start ‘Menu‘, then type ‘Task Scheduler‘, and press Enter.
In the Task Scheduler, look through the library of tasks for any that might open a Command Prompt window. Pay special attention to the Task Scheduler Library and any tasks that are set to run at user login.
Check for Malware
It’s a good idea to run a thorough malware scan using your antivirus software. You can also use Windows Defender, which is built into Windows 10, or another reputable third-party antivirus program.
If you suspect something nefarious going on, you will need to use an online virus and malware scanner. Google “online virus malware scanner” and select ESET, Malwarebytes and HitmanPro and scan your hard drive. All have one-time, free scanner options (no credit card necessary).
Examine Group Policy Scripts (for advanced users)
This step is primarily for users with company networking.
Open the Run dialog (Windows Key + R), type ‘gpedit.msc‘, and press Enter to open the Group Policy Editor. This is only available in Professional and Enterprise editions of Windows.
Navigate to User Configuration -> Windows Settings -> Scripts (Logon/Logoff). Check if any scripts are configured to run at logon.
Similarly, check Computer Configuration for system-wide settings.
Registry for Startup Commands
Important: Be cautious when disabling startup items, editing tasks, or modifying the registry.
If you’re unsure about the impact of changing or disabling a specific item, it’s best to seek additional information or consult with someone knowledgeable.
Open the Run dialog, type regedit, and press Enter to open the Registry Editor. Navigate to these two registries:
Look for any suspicious entries that might be triggering the CMD windows.
Final Thoughts
If these steps don’t resolve the issue or you’re uncomfortable making these changes on your own, it might be helpful to consult with a professional IT support provider or a trusted tech-savvy friend.
NameCheap has been around for ages and they are a solid, tier 1 registrar.
So it’s no surprise that they give you a 30 day grace period to renew your domain name after its expiration (some other registrars grab expired domain names and either charges a lot of money to renew and send them to their in-house auction market).
However, there can be some confusion when renewing an expired domain name with NameCheap.
I believe for the first 10 days or so, you can just add the expired domain name to your cart and RENEW.
For domain names that have expired from 11 to 30 days ago, you need to REACTIVATE them.
It used to be that reactivation would allow to proceed to renewals but NameCheap changed the process.
Now, reactivation process renews the domain name.
Steps to reactivate and renew your expired domain name
Step # 1 – log into your NameCheap account (BTW, I highly recommend you turn on the Two Factor Authentication (2FA) feature to secure your account)
Step # 2 – Click on the EXPIRING/EXPIRED link from the left navigation bar
Step # 3 – add the expired domain name to the shopping cart
Step # 4 – In the shopping cart, the section just under the domain name is called a “PROCESS ORDER TYPE” and it should say REACTIVATION. Click on Confirm to place the order.
Note that if you placed your expired domain name in the shopping cart during first 10 days into the expiration, the process order type will say RENEW. If you try to process the shopping cart when your domain name is not 11+ days into expiration, the order will fail. In that case, you need to first delete the expired domain name from the shopping cart, then re-add it.
cPanel is a popular web hosting control panel used for managing websites and hosting accounts. cPanel is most often provided by shared hosting companies like Hostgator and BlueHost.
In this post, I will show you how to upload files to your website or edit htaccess file using cPanel’s “file manager”
What is cPanel?
In essence, cPanel simplifies the file management tasks, making it easier for individuals, especially those with limited technical expertise, to edit or upload the htaccess file (click here to read more about htaccess).
It’s widely used because of its user-friendly, graphical interface and robust set of features. Here’s a rundown of what cPanel offers:
Website Management: cPanel provides tools to manage your websites, like File Manager for accessing and editing files, and FTP (File Transfer Protocol) accounts for uploading files.
Domain Management: You can add and manage domains and subdomains, configure DNS settings, and set up redirects.
Email Management: cPanel allows you to create and manage email accounts associated with your domains, set up email forwarders, and configure spam filters.
Database Management: It supports database creation and management, typically with MySQL, allowing you to manage databases, users, and permissions.
Security Features: Includes options for password protecting directories, managing SSL/TLS certificates, and configuring firewalls.
Software Installations: With tools like Softaculous or Fantastico, you can easily install various web applications like WordPress, Joomla, or Drupal.
Server and Site Monitoring: You can view statistics about your website’s performance and server resources, such as bandwidth and disk space usage.
Backup and Restore: cPanel provides options to backup and restore your website data.
User-Friendly Interface: Its graphical interface makes it easier for users without deep technical knowledge to manage web hosting aspects.
If You Need a Solid Web Host
If You Are Looking for a Web Hosting
I personally have been using MDD Hosting for over 10 years. They are a small hosting company with excellent reliability and awesome support. Something that you will not find at super large hosting companies. Give MDD Hosting a try, you won’t regret it!
Step-by-Step Guide to Uploading Files
Step 1: Browse to your web hosting account
First, using your favorite web browser, head over to the web host’s account page. Log in to your account and you will find yourself at the cPanel screen.
What you will see depends on cPanel version and your web host’s desire to turn on or off certain features. But for the most part, you should see things like Files, Domains, Redirects, Backup Wizard, WordPress Manager by Softaculous, etc.
Step 2: The File Manager – Your Trusty Sidekick
Once inside, seek the “File Manager” icon. It’s your trusty sidekick in this quest. Click on it.
Step 3: Choosing Your Battlefield
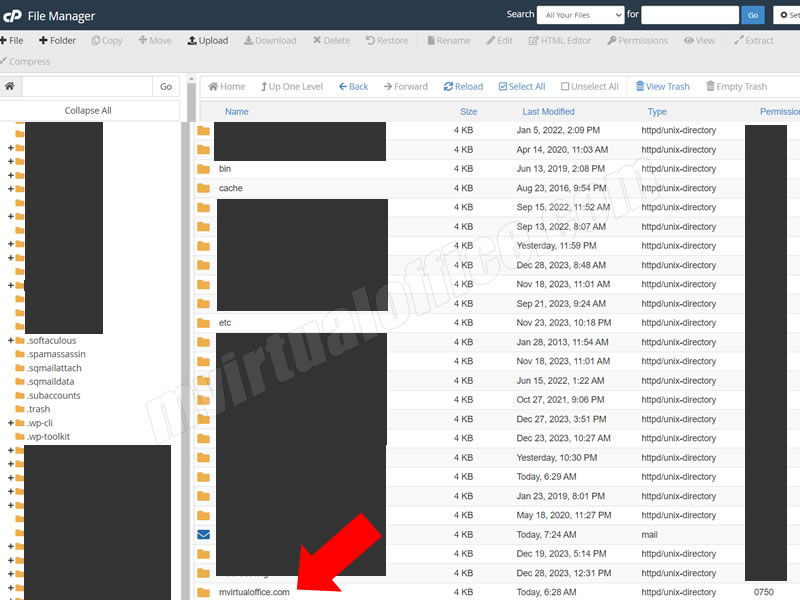
Now, the question arises: Where to upload? If you want to upload your htaccess file, the “public_html” folder is where the action is for your main site. If you have subdomains or add-ons, they’ll have their own named folders.
For example, I have a bunch of other test sites under my hosting account, in addition to mvirtualoffice.com (hence the blocked out sections in the above image). You need to click on the manila file folder next to the domain name to further drill down into that directory.
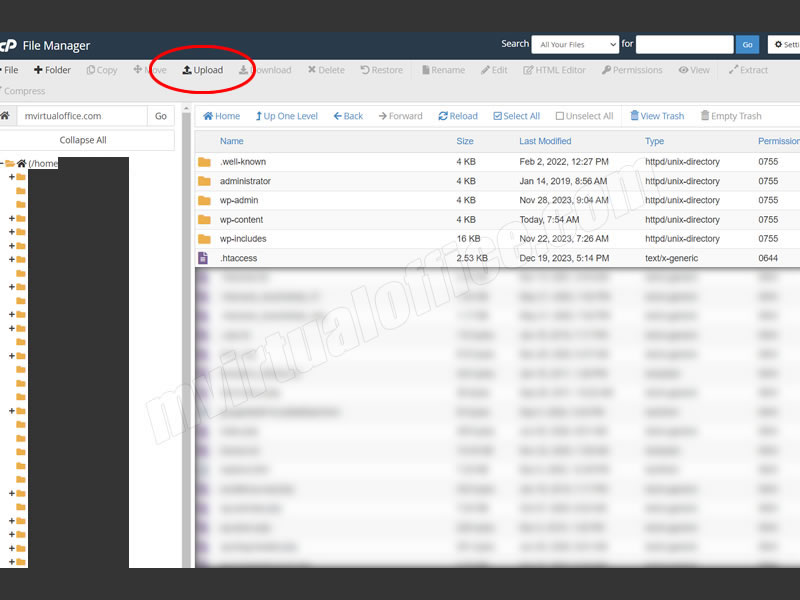
Step 4: Uploading – The Main Event
Here comes the main event: uploading files. Look for the “Upload” button, usually residing at the top of the page. Click it, and a new tab opens, beckoning you to drag and drop files or select them manually.
Step 5: The File Transfer Dance
As you select files, watch them dance into the cPanel realm. A progress bar keeps you company, narrating the tale of each file’s journey. Once the bar hits 100%, your files have successfully teleported to their new home.
Step 6: File Editing
Let’s say you want to edit your htaccess file. You can either download the file, edit it within your laptop/desktop, and re-upload it or you can just make the changes within cPanel.
You can use the steps previously outlined above when using the first editing method.
If you want to edit the file in place, follow these steps:
Step A: Locate the htaccess file and double click on either the purple folder OR the name to save the file to your local computer
Step B: Make sure that htaccess file is highlighted, then click on the EDIT icon (just below the cPanel ribbon) to edit the file
Step C: Edit and save the file
The “Gotchas” – Beware of These Sneaky Traps!
File Size Limit: There’s a cap on how much your files can weigh. If your files are too plump, consider breaking them into smaller bites or increase the limit via PHP settings – a tale for another day.
File Types: cPanel, like a picky eater, may refuse certain file types. If so, tweak the settings or zip them up to disguise their true form.
Overwriting Files: Uploading a file with a name that already exists is like challenging it to a duel. The new file wins, erasing the old one. So, double-check file names unless you seek an unexpected vanishing act.
Final Thoughts
There you have it, intrepid explorers! Uploading files in cPanel is like a mix of alchemy and a treasure hunt. Embrace the adventure, and remember: every click, drag, and drop adds a stroke to the masterpiece that is your digital presence.
Greetings, remote warriors! Today, we’re diving into a bit of tech wizardry that’s both incredibly useful and surprisingly straightforward. It’s all about resurrecting the charm of DOS in the modern era, and we’re doing it with Rufus, a nifty little tool that turns your USB drive into a DOS-powered machine. Hang tight; this is going to be a fun ride, even if you’re not a tech geek!
Why Would you need to create a bootable drive?
Why would someone in this age need DOS? Well, imagine you’ve got some old-school software that refuses to play nice with Windows 10, or perhaps you need to recover data from a computer that’s seen better days. That’s where FreeDOS, a modern spin on the classic MS-DOS, comes into play. And Rufus? That’s your magic wand to make it happen.
Here’s the deal with Rufus: it’s free, open-source, and as clean as a whistle – no malware or viruses here. You can grab it from its official website. Now, let’s get our hands dirty (not literally, though).
Step-by-Step Guide to Creating a Bootable DOS USB Drive with Rufus
Prerequisites:
A USB flash drive (minimum capacity 2 GB recommended).
A computer with internet access to download Rufus and FreeDOS.
Ensure all important data on the USB drive is backed up, as the process will erase all data on it.
Step 1: Download Rufus
Navigate to the official Rufus website: https://rufus.ie/en/
Download the latest version of Rufus.
Step 2: Prepare the USB Drive
Insert your USB flash drive into an available USB port on your computer.
Ensure the drive is recognized by your operating system.
Step 3: Launch Rufus
Locate the downloaded Rufus executable file.
Run Rufus. Note: Rufus does not require installation and can be run directly.
Step 4: Configure Rufus Settings
In Rufus, under the ‘Device’ section, select your USB drive from the dropdown menu.
In the ‘Boot selection’ section, choose ‘FreeDOS’ from the dropdown list.
For specific needs, select ‘FreeDOS (non-free drivers)’ to include additional driver support.
Under ‘Partition scheme’, choose ‘MBR’ or ‘GPT’ based on your system requirements.
MBR (Master Boot Record) is generally suitable for older systems.
GPT (GUID Partition Table) is used for newer systems.
Ensure the ‘File system’ is set to ‘FAT32’, which is compatible with DOS environments.
Assign a ‘Volume label’ as desired (e.g., DOS_USB).
Under ‘Advanced format options’, ensure ‘Quick format’ is checked for faster formatting.
Step 5: Start the Creation Process
Click the ‘Start’ button in Rufus.
A warning message will appear indicating that all data on the USB drive will be destroyed. Confirm by clicking ‘OK’.
Step 6: Monitor the Process
Rufus will format the USB drive and install FreeDOS.
Observe the progress bar. The process may take a few minutes depending on the speed of the USB drive and the computer.
Step 7: Completing the Process
Once Rufus indicates ‘READY’ at the bottom of the window, the bootable DOS USB drive creation is complete.
Safely eject the USB drive from your computer.
Step 8: Using the Bootable DOS USB Drive
Insert the bootable DOS USB drive into the target computer.
Reboot the computer.
Access the BIOS/UEFI settings during startup (usually by pressing keys like F2, F12, Del, etc.).
In the BIOS/UEFI menu, navigate to the boot options and set the USB drive as the first boot device.
Save the settings and exit the BIOS/UEFI.
The computer will restart, and you should be greeted with the FreeDOS command prompt.
Tips and Troubleshooting:
If the computer does not boot from the USB drive, recheck the BIOS/UEFI settings for boot order.
Ensure the USB drive is properly formatted and the bootable creation process in Rufus was successful.
If encountering issues with Rufus, consider redownloading the software or using a different USB drive.
By following these steps, you should successfully create a bootable DOS USB drive using Rufus, suitable for running DOS-compatible applications and utilities.
Wrapping Up
In conclusion, combining Rufus with FreeDOS is akin to equipping yourself with a versatile tech tool, much like a Swiss Army knife for your digital endeavors. This potent duo is not only straightforward and user-friendly but also robust in its capabilities.
Whether you’re aiming to breathe life into vintage software, retrieve data from systems that have seen better days, or simply indulge in some tech nostalgia, Rufus and FreeDOS are your reliable allies. Beyond their practical applications, the open-source nature of FreeDOS adds a layer of flexibility, allowing users to freely use, adapt, and share it without the constraints of legal or financial barriers.
This makes the Rufus and FreeDOS combination an invaluable asset for developers, technical professionals, and even savvy personal users who appreciate the essence of classic computing in a modern context. Happy computing as you explore and leverage the dynamic capabilities of Rufus and FreeDOS!
If you maintain a website utilizing a self-hosted WordPress setup and have Cloudflare CDN and LiteSpeed Cache plugin, you will want to read this post. When managing a WordPress website with dyamic content, optimizing page load times is crucial for user experience and SEO. The caching settings in Cloudflare play a significant role in this…
In the ever-evolving landscape of search engine optimization (SEO), the dialogue between technology creators and users plays a pivotal role in shaping the tools and practices that become the standard. Recently, a fascinating discussion unfolded on a public forum, shedding light on the integration and efficacy of IndexNow in SEO practices, particularly in relation to…
To permanently redirect all traffic from your site to another site’s page using the .htaccess file, you can use the following rule: RewriteEngine on RewriteRule ^(.*)$ http://www.example.com/$1 [R=301,L] Replace http://www.example.com/ with the URL of the page you want to redirect all your traffic to. This rule uses a 301 redirect, which is understood by browsers…
When you are working in the search engine optimization field, sometimes you need to scan the source page where inbound links are originating from. In many cases, there is no quick and easy way of scanning a page without digging through HTML. Instead, there are several free tools and methods available to scan a webpage…
To prevent your WordPress theme from being detected by sites like “WhatThemeIs” and others, you can take several steps to obscure or hide details about your theme and plugins. While it’s difficult to make your site completely undetectable without affecting its functionality, you can make it harder for automated tools to identify your theme and…
When reviewing your Google Search Console –> Page Indexing –> Not found (404) error pages, you may be surprised to see page URLs that you did not create. This can be confusing and concerning and there are several reasons why this might happen: External Links One common source of error is that other websites may…
Hello, fellow remote workers, freelancers, and solopreneurs! If you’re like me, working from the comfort of your home for the past 15 years, you know the importance of a reliable and fast internet connection.
Today, let’s dive deep into a common query that perplexes many of us: Why can’t we reach that elusive 1 Gig WiFi speed?
The Current State of WiFi Technology
In understanding why achieving 1 Gig WiFi speeds can be challenging, it’s vital to look at the evolution of WiFi technology. Currently, we’re in the era of WiFi 6 (802.11ax), a significant leap forward in terms of speed and efficiency. However, to fully appreciate this, let’s glance back at the previous WiFi standards and their theoretical maximum speeds:
WiFi 1 (802.11b): Introduced in 1999, this standard could achieve up to 11 Mbps. It was a breakthrough at its time but is now considered quite outdated.
WiFi 2 (802.11a): Also emerging around 1999, this standard offered up to 54 Mbps. It operated on a different frequency band (5 GHz) compared to 802.11b (2.4 GHz).
WiFi 3 (802.11g): Released in 2003, this iteration brought improvements, offering speeds up to 54 Mbps, similar to 802.11a, but operated on the more common 2.4 GHz band.
WiFi 4 (802.11n): Launched in 2009, this standard marked a significant jump, with speeds up to 600 Mbps. It operated on both 2.4 GHz and 5 GHz bands and introduced MIMO (Multiple Input Multiple Output) technology.
WiFi 5 (802.11ac): Coming into play around 2014, this standard took a leap forward, offering speeds up to 3.46 Gbps under ideal conditions. It exclusively used the 5 GHz band and enhanced MIMO technology.
Now, with WiFi 6 (802.11ax), we’re looking at even higher capabilities and efficiencies. However, reaching the theoretical maximum speeds of any WiFi standard in real-world conditions is influenced by various factors, including device capabilities, network congestion, physical obstructions, and ISP limitations.
Investigating Network Reliability
In my two decades of experience in corporate and data center environments, I’ve seen firsthand how network reliability can vary.
For instance, Verizon Fios and Optimum Online, two prominent players, offer differing experiences.
Fios is known for its fiber-optic technology, which generally delivers more consistent speeds and reliability.
Optimum Online, while reliable, may have different performance metrics due to its infrastructure makeup. Your choice between these can significantly impact your WiFi experience.
Top 5 Reasons You’re Not Hitting 1 Gig Speeds
Now, let’s pinpoint the top five reasons why your WiFi might not be living up to its 1 Gig potential:
Interference and Range Limitations: WiFi signals can get muddled due to physical obstructions or interference from other devices. The further you are from the router, the more the signal degrades.
Network Congestion: If you have a plethora of gadgets connected to your network, each vies for a slice of your bandwidth. This digital tug-of-war can drastically reduce individual device speeds.
Hardware Limitations: Not all routers and devices are created equal. Older models might not support the higher speeds that newer standards offer.
ISP Throttling or Limitations: Sometimes, the bottleneck is your Internet Service Provider (ISP). If your plan doesn’t support 1 Gig speeds or if there’s throttling, you won’t hit those high numbers.
Incorrect Network Configuration: A misstep in your network setup can be like driving with the handbrake on. Inefficient configurations can lead to significant speed drops.
Technical Analysis and Troubleshooting Steps
1. Tackling Interference and Range Issues:
Optimize Router Placement: Keep it central, away from walls and obstructions.
Use a Mesh Network System: This can extend the reach and improve coverage.
2. Easing Network Congestion:
Limit Connected Devices: Disconnect devices that aren’t in use.
Prioritize Traffic: Use Quality of Service (QoS) settings to prioritize high-need devices.
3. Upgrading Hardware:
Invest in a Modern Router: Ensure it supports WiFi 6 for optimal performance.
Update Device Network Cards: Older devices might need an upgrade to match newer WiFi standards.
4. Addressing ISP Limitations:
Check Your Plan: Ensure your ISP plan supports 1 Gig speeds.
Consult Your ISP: Sometimes a call can resolve hidden issues or throttling.
5. Refining Network Configuration:
Update Firmware: Always keep your router firmware up-to-date.
Consult a Professional: If you’re not tech-savvy, getting professional help can be a game-changer.
Wrapping Up
Achieving 1 Gig WiFi speeds is not just about having the right tools; it’s about understanding and optimizing your entire network ecosystem. With these insights and strategies, you’re well on your way to getting the most out of your home office setup. Remember, in the world of WiFi, every little adjustment can lead to significant improvements. Keep experimenting, and stay connected!
Using a Gmail account to access various websites and services instead of creating separate accounts for each can be incredibly convenient and efficient. This approach simplifies the login process, as it reduces the number of usernames and passwords a user needs to remember.
It also leverages the security measures of Google, which are typically robust, including features like two-factor authentication. This consolidation of accounts under a single, secure login can potentially reduce the risk of password-related breaches.
Furthermore, using a Gmail account can streamline the user experience across different platforms, allowing for easier integration and syncing of personal data and preferences.
This method is particularly beneficial for those who frequently use Google’s suite of services, as it ensures a seamless transition and interaction between these services and the third-party websites accessed via the Gmail account.
Cons
However, using a Gmail account as a universal login for multiple websites and services has its downsides.
This practice can create a single point of failure; if the Gmail account is compromised, it potentially grants an attacker access to all connected services and websites. This concentration of access increases the risk and potential impact of a security breach.
Additionally, it can lead to privacy concerns, as linking various accounts to a single email address may allow for more extensive tracking and profiling by service providers and third-party advertisers. It also means relying heavily on Google’s security protocols, leaving users vulnerable if these are breached.
Furthermore, it can be challenging to disentangle the Gmail account from numerous services if one decides to switch email providers or de-clutter digital footprints, leading to a complicated and time-consuming process of account management and maintenance.
How to Check
To check if there are websites or services attached to your Gmail account, you can follow these steps.
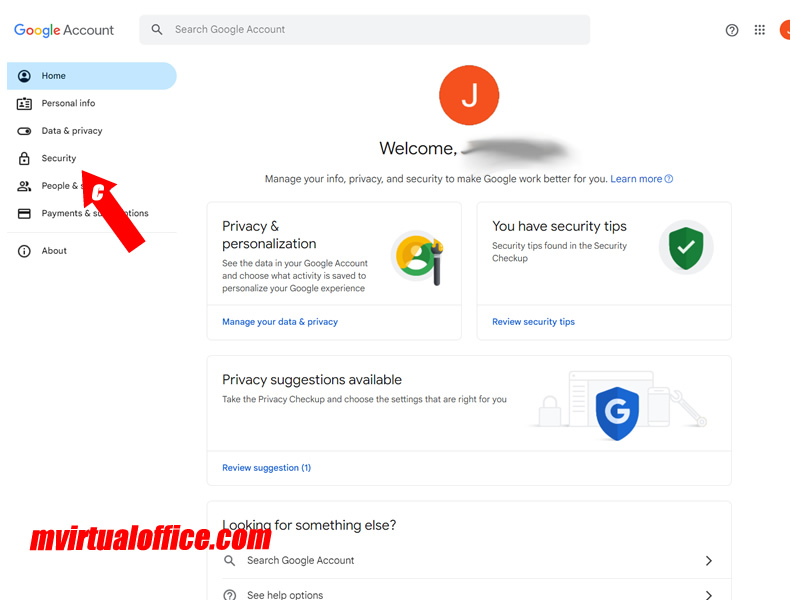
Step # 1 – Visit Google Account and sign in with your Gmail credentials.
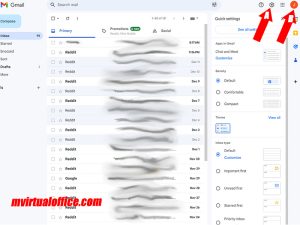
Step # 2 – look at the upper right hand corner of the screen. You will see a gear logo and a circle with your first name initial.
Step # 3 – Gear Icon (A) leads you to a SETTINGS screen.
Step # 4 – Clicking on the Name Icon (B) leads you to the “Manage Your Google Account” for security settings, then click on the SECURITY link from the navigation panel.
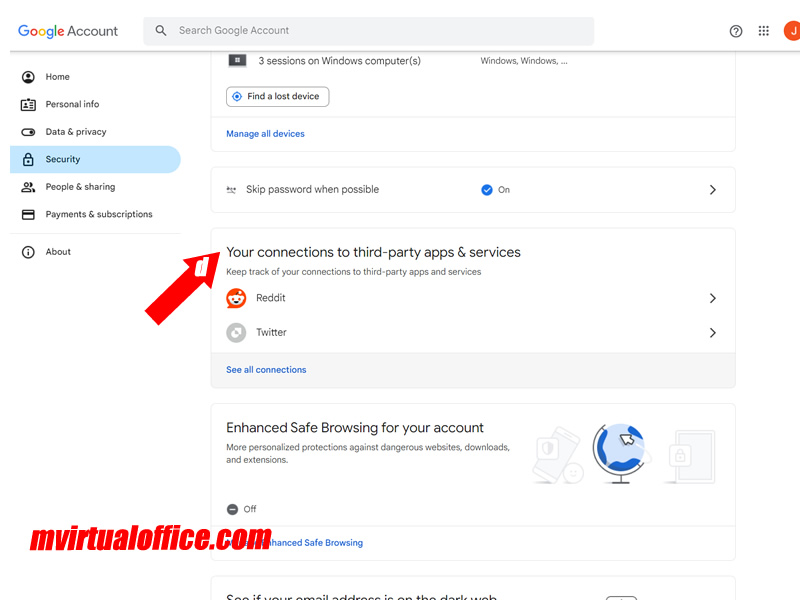
Step # 5 – Scroll down about half way to find the “YOUR CONNECTIONS TO THIRD-PARTY APPS & SERVICES” and identify devices connected to your account and the third-party sites that have access to your account.
Step # 6 – Click on each app or site to see the details of the access it has. If you see an app or site that you no longer use or do not recognize, you can revoke its access by selecting “Remove Access.”
Conclusion
It’s a good practice to periodically check this section of your Google account to manage your account’s security and privacy.
This process will help you understand which third-party apps and websites have access to your Gmail and other Google services, and allow you to manage those permissions.
If you use an Excel spreadsheet to keep track of tasks and time associated with it, it’s cumbersome to constantly type in XX:YY.
Here is a short technique to format the cell so when I enter a time (0500), it will automatically convert it to 05:00.
To format a cell in Excel 2019 so that when you enter “0500”, it automatically converts to “05:00”, you can use a custom format. Here’s how to do it:
Select the cell or range of cells where you want to apply this formatting.
Right-click on the selected cell(s) and choose ‘Format Cells’ from the context menu.
In the ‘Format Cells’ dialog box, go to the ‘Number’ tab.
Choose ‘Custom’ from the category list.
In the ‘Type’ field, enter the custom format: 00":"00. This format tells Excel to split the number into two pairs of digits, separated by a colon.
Click ‘OK’ to apply the formatting.
Now, when you enter a number like 0500 in the cell, it will automatically be displayed as 05:00. Note that this is a display format and the underlying value in the cell will still be 0500. This method is best for display purposes and won’t actually change the data into a time value. If you need to perform time calculations, you might need a different approach to convert the input into a proper time format.
Integrating Google Analytics into a WordPress website is a crucial step for website owners looking to gain insights into their visitor behavior and site performance.
Whether you’re using GeneratePress as your theme or any other, there are straightforward methods to add your Google Analytics tracking ID.
The two most common approaches include using the Google Site Kit plugin for a more automated process or manually inserting the tracking code into your site’s header.
This guide will walk you through both methods, helping you choose the best option for your needs and ensuring that your website is well-equipped to gather valuable analytics data.
Google Site Kit
Google Site Kit is an invaluable tool, especially for non-tech savvy WordPress users GeneratePress theme.
As an official plugin developed by Google, Site Kit simplifies the process of adding Analytics to your website. It allows you to connect directly to your Google Analytics account and automatically embeds the necessary tracking code across all pages of your site. This eliminates the need for manual code insertion, making it an ideal solution for those who prefer a more streamlined and user-friendly approach.
Additionally, Google Site Kit provides the convenience of viewing key analytics data directly within your WordPress dashboard, offering a seamless integration that enhances your site management experience.
Adding Google Analytics Code Using Google Site Kit Plugin
Before we begin, you will need first need to create a Gmail account, then enroll that email account with Google Analytics and Google Search Console platforms (click here if you need instructions).
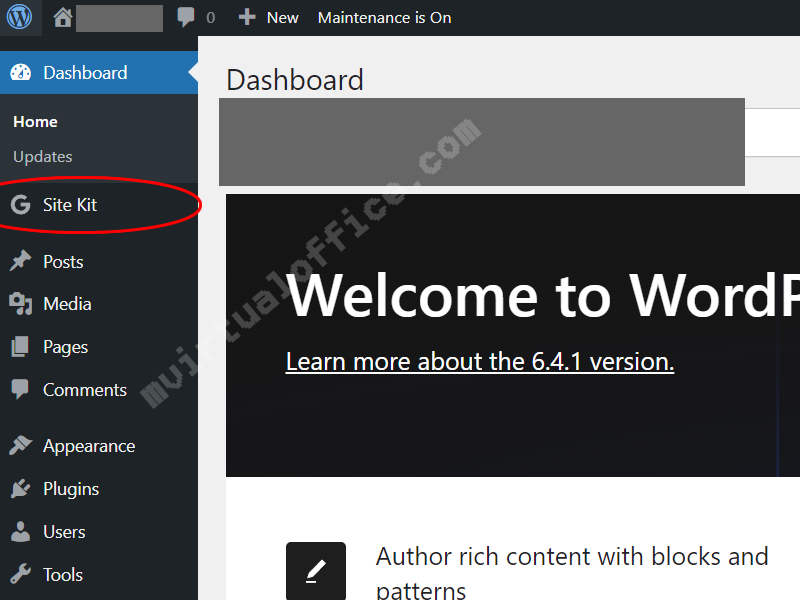
Step # 1 – Install Google Site Kit Plugin:
Go to your WordPress dashboard.
Navigate to ‘Plugins’ > ‘Add New’.
Search for ‘Google Site Kit’, install, and activate it.
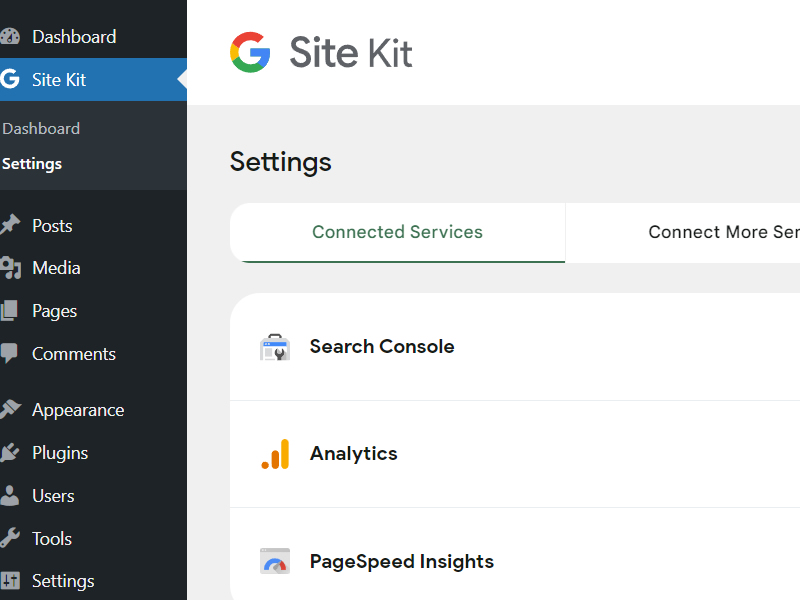
Step # 2 – Setup Google Site Kit:
Once activated, go to the new ‘Site Kit’ menu.
Follow the setup instructions to connect your Google account.
Step # 3 – Connect Google Analytics:
In the Site Kit dashboard, find and connect the Google Analytics module.
Follow the on-screen instructions to link your Google Analytics account and select the correct property (your website).
Verification and Ready to Go:
Google Site Kit will automatically add the tracking code to your site.
You can view analytics data directly in your WordPress dashboard.
Manually Adding the Tracking Code
Manually adding the Google Analytics tracking code offers a hands-on approach for WordPress users who prefer direct control over their site’s configuration.
This method involves accessing the Google Analytics platform to obtain your unique tracking code and then embedding it into your WordPress site, typically within the header section. This is done either by editing the theme files directly or using the theme’s custom code options, such as in the GeneratePress theme.
Performance Considerations
Be aware that adding scripts like Google Analytics to the header can affect the loading time of your site, as these scripts are loaded before the page content.
While this approach requires a bit more technical know-how compared to using a plugin like Google Site Kit, it provides flexibility in terms of code placement and ensures that the tracking code remains intact even if you change plugins or themes in the future.
It’s an effective choice for those who have a specific setup in mind or want to maintain a minimal number of plugins on their site.
Access the WordPress Customizer:
Go to your WordPress dashboard.
Navigate to ‘Appearance’ > ‘Customize’.
Navigate to Widgets:
In the Customizer, look for the ‘Widgets’ section.
Click on it to access the widget areas provided by your theme.
Select the Header Widget Area:
Find the ‘Header’ widget area. The availability of this area depends on your theme configuration, so ensure your version of GeneratePress includes it.
Click on the Header area to add a widget to it.
Add a Custom HTML Widget:
Click ‘Add a Widget’ and choose ‘Custom HTML’ from the list of available widgets.
Paste your Google Analytics tracking code into the content area of the Custom HTML widget.
Save and Publish:
After adding the code, click ‘Publish’ to save your changes.
This will add the Google Analytics tracking code to every page of your site, as the header is typically loaded on every page.
Verify the Tracking Code:
After publishing, you can check your site’s source code or use tools like Google Tag Assistant to verify that Google Analytics is properly set up and receiving data.
Wrapping Up
In conclusion, integrating Google Analytics with the GeneratePress theme on your WordPress site can be effectively achieved through two distinct methods: using the Google Site Kit plugin or manually inserting the tracking code.
The Google Site Kit plugin offers a user-friendly and streamlined approach, ideal for those who prefer a simple, plugin-based solution that also allows for easy access to analytics data within the WordPress dashboard.
On the other hand, manually adding the tracking code, either through a Custom HTML widget in the header or by editing theme files (especially when using a child theme), provides more control and flexibility, particularly for users comfortable with a bit of coding.
Both methods ensure that your Google Analytics is set up correctly, enabling you to track visitor data and gain valuable insights into your website’s performance.
There are other methods of adding the Google Analytics tracking code, such as modifying the header.php or functions.php files, but I do not recommend them as they are tricky to add and can break your site.
The primary purpose of this post is to show you how to setup your inside wiring so that you can easily switch back and forth between Verizon FIOS and Optimum Online (or any other broadband carrier).
This is the so that you can take advantage of the “new customer” bonuses as well as (sometimes) lower monthly fees.
Of course, you have to be lucky to live in an area where both services.
Is switching back and forth worth the trouble?
The definition of “worth” is unique to each individual.
I work from home so waiting for a technician to show up on the installation day is not a big deal.
Sometimes I switch when one company drops the ball and leave me without a service for longer than few hours (not counting acts of “God” outages).
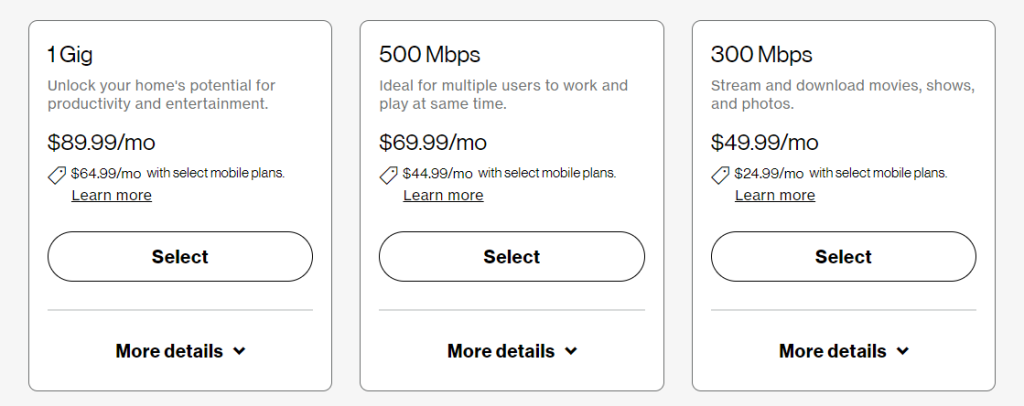
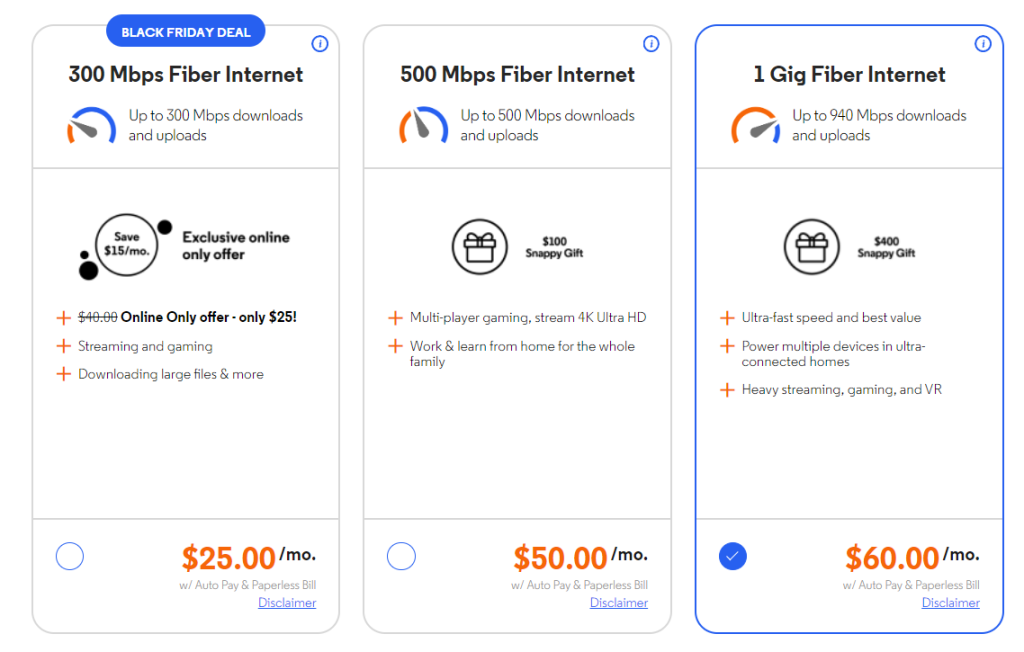
Of course, the signing bonus as a “new” customer is nothing to sneeze at either. The most recent switch from Optimum Online to Verizon FIOS in July 2023 netted me the following:
$200 Home Depot Gift card
$200 Verizon Gift card
One primary router + 2 extenders (all free)
$90 per month for 1 gig fiber service ($10 more than Optimum’s 1 gig)
If I were to switch back to Optimum now (December 2023), I would get:
$400 Gift card
$60 per month for 1 gig (without signing up for their wireless bundle price)
Being “fair”
I am not going to switch back after 5 months of service because I don’t think that is fair to Verizon.
Instead, I will stay until my one year anniversary and re-assess if I want to stay or switch.
Because of my wiring setup, it is super easy to switch from one company to another. Generally, it works out to be about 1.5 hours from the time tech arrives at my home, switch around few connections, test, and leave.
Requirements
As I said before, you obviously need two carriers for this to work.
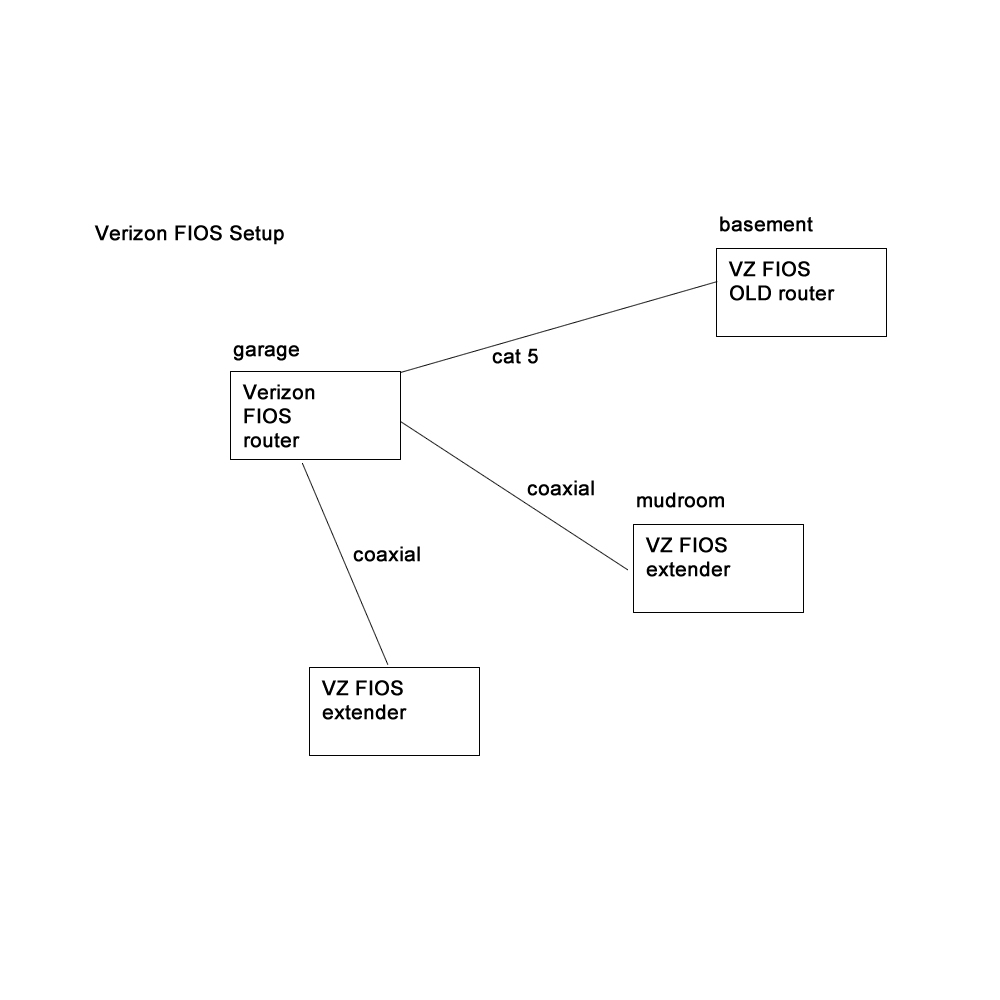
Second, if you need to use extenders with Verizon FIOS, you will need coaxial connections near the extenders. Optimum extenders act as wireless repeaters so you do not need coaxial cables.
Because Verizon extenders are physically connected to the primary router, connecting to the internet via an extender will give you better performance (i.e. speed and connection reliability).
Verizon FIOS
Verizon FiOS, an acronym for Fiber Optic Service, represents a significant leap in internet service technology. Launched in 2005, Verizon FiOS was one of the first major fiber-to-the-premises (FTTP) services in the United States, marking a departure from the traditional copper wire and coaxial cable networks. This innovative service utilizes optical fibers, which are tiny, hair-like glass strands designed to transmit data using light signals. The implementation of fiber optics allows for considerably higher speeds and reliability compared to traditional broadband services.
The technical foundation of FiOS is rooted in its use of passive optical network (PON) technology. In this setup, a single fiber optic line can service multiple customers, making it a cost-effective and efficient solution. This is in contrast to the point-to-point architecture used in some other fiber networks. FiOS delivers internet, television, and telephone services through this fiber network, leveraging the high bandwidth capabilities of optical fibers. The service offers symmetrical upload and download speeds, which means users can enjoy the same high speeds for both activities – a notable advantage over many cable and DSL services.
One of the remarkable technical aspects of FiOS is its speed offerings. FiOS service offers internet plans with speeds ranging from 300 Mbps to up to an astounding 940 Mbps. This range of speeds caters to a wide array of needs, from basic browsing and streaming to intensive gaming and large data transfers. Moreover, the fiber optic network is less susceptible to interference and signal degradation over distances, ensuring a stable and consistent connection.
In terms of infrastructure, FiOS required a significant overhaul of Verizon’s existing network. The company invested billions of dollars in laying out fiber optic cables across its service areas. This was a massive undertaking, as it involved not just the laying of new cables but also the installation of new infrastructure like Optical Network Terminals (ONTs) at customer premises. An ONT converts the optical signal back into electrical signals for internet, TV, and phone services.
However, FiOS is not without its drawbacks. The primary limitation of FiOS is its availability. Due to the high costs associated with laying fiber optic cables, FiOS is primarily available in urban and suburban areas, leaving rural areas often out of reach. This limited availability can be a significant downside for potential customers living outside the covered areas.
In addition, FiOS plans tend to be more expensive than traditional broadband plans, reflecting the higher costs of maintaining a fiber optic network. While the service offers superior speed and reliability, the price point can be a barrier for some customers.
Lastly, Verizon’s competitors started to boost their speeds where Optimum Online’s fastest offering is at 8GB while Verizon FiOS is capped at 1 GB.
Verizon FiOS Plan Pricing (as of December 1, 2023)
In conclusion, Verizon FiOS stands out in the broadband market due to its advanced fiber optic technology, providing exceptionally high speeds and reliable service. Its history as a pioneer in FTTP services and its continued investment in infrastructure demonstrate Verizon’s commitment to leading the broadband market. However, the service’s limited availability and higher cost are notable considerations for potential customers. As fiber optic technology continues to evolve and expand, FiOS is likely to remain at the forefront of high-speed internet services.
Optimum Online
Optimum Online, a service provided by Altice USA, is a significant player in the broadband internet market, particularly in the Northeastern United States. Unlike Verizon FiOS, which is based on fiber-optic technology, Optimum primarily relies on a hybrid fiber-coaxial (HFC) network. This technical composition and its evolution over the years shape the service’s strengths and limitations.
Fiber vs Coaxial Cables
Both carriers provider fiber cable endpoint connection to homes. Ironically, Verizon requires the use of coaxial cable to make the connection between the primary routers to router extenders.
On the other hand, Optimum Online does not use coaxial inside the home. Instead, the primary router/modem makes connection to extended routers using WiFi signal or ethernet cables.
Optimum Online: Technical Overview and History
Optimum Online’s journey began in the late 1990s, evolving from a traditional cable TV provider to an internet service provider. The technology underlying Optimum’s internet service is a blend of fiber-optic and coaxial cables. This HFC network is a common infrastructure used by many cable internet providers. In this setup, fiber-optic cables are used for the backbone of the network, carrying data over long distances with minimal loss and high bandwidth. The final connection to the customer’s home, however, is made using coaxial cables. This combination allows for faster data transmission compared to older, entirely coaxial networks, but it typically falls short of the speeds and consistency achievable with a full fiber-optic network like FiOS.
One of the critical aspects of Optimum’s technology is its use of DOCSIS (Data Over Cable Service Interface Specification). This international telecommunications standard enables high-bandwidth data transfer over existing cable TV systems. Optimum has upgraded its network over the years in line with advancements in DOCSIS technology. With the adoption of DOCSIS 3.1, Optimum can offer higher internet speeds, theoretically up to 1 Gbps under ideal conditions. However, actual user experiences may vary due to network congestion and the shared nature of cable networks.
Optimum’s internet speed offerings, as of my last update, ranged from basic plans suitable for everyday browsing and streaming to higher-tier plans designed for heavy data usage and high-definition content streaming. The speed range and plan options cater to a diverse set of customer needs, from individual users to large households with multiple devices.
In terms of infrastructure, Optimum’s reliance on an HFC network meant a different kind of investment compared to Verizon’s FiOS. The company has continually upgraded its existing cable network infrastructure to enhance capacity and speed, adapting to the growing demand for high-speed internet. This ongoing process involves both upgrading the physical cables and enhancing the network equipment, such as modems and routers provided to customers.
Pros and of Optimum Online
The main advantages of Optimum Online include wider availability and competitive pricing. Due to its use of existing cable networks, Optimum’s services are accessible to a broader range of customers, including those in areas where laying new fiber-optic lines is not economically viable. Additionally, Optimum’s plans are often more affordable than those of pure fiber-optic services, making high-speed internet more accessible to a wider customer base.
Cons of Optimum Online
However, there are drawbacks to Optimum’s service. The most notable is the variability in internet speeds. Because the network is partially based on shared coaxial lines, users may experience slower speeds during peak usage times. This inconsistency can be a significant issue for users who require stable and high-speed internet for activities like gaming or video conferencing.
Another limitation is the potential for technological obsolescence. As internet technology advances and demand for higher speeds and more reliable connections grows, HFC networks might struggle to keep up with pure fiber-optic networks in terms of performance and scalability.
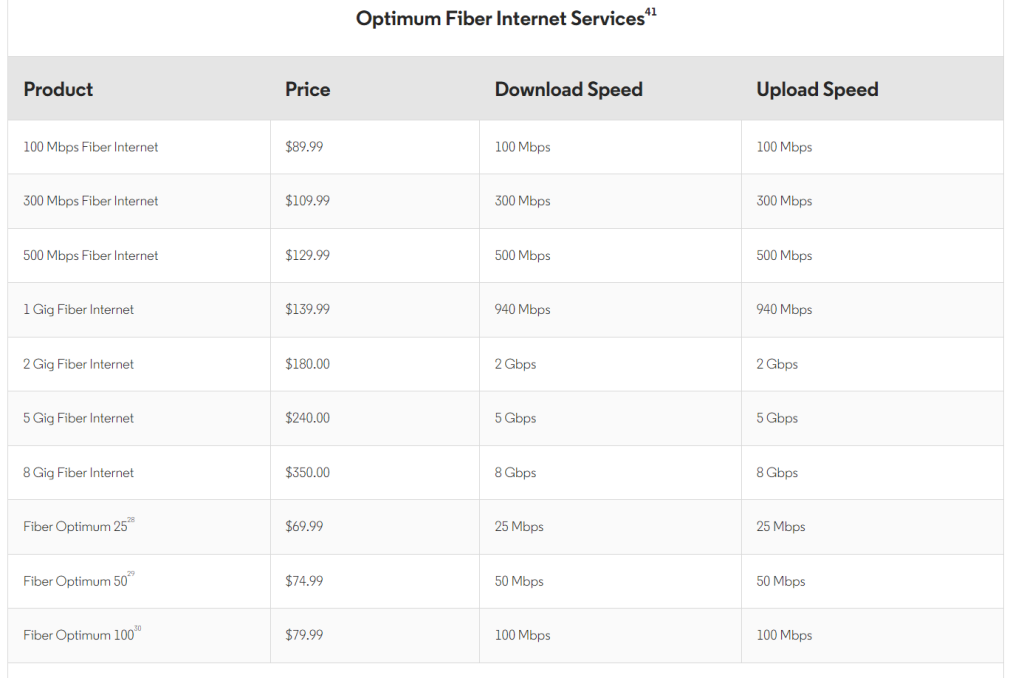
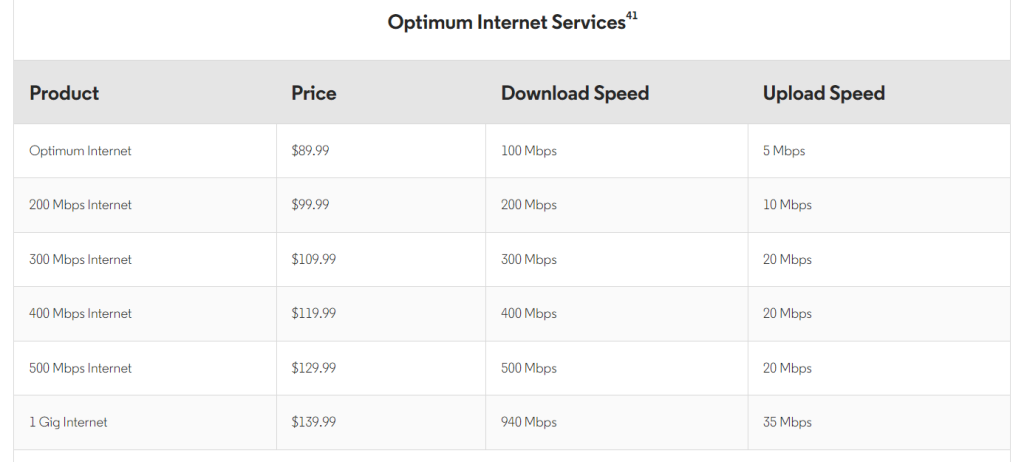
Lastly, there are some confusions surrounding backend infrastructure. For example, the Optimum Online’s plans (see above) clearly says “xxx Mbps Fiber Internet”, but if you visit their official pricing plan page (click here), it has two different pricing tables (“Fiber Internet Services” vs. “
Optimum Fiber Internet Services (pricing as of December 1, 2023)
Optimum Internet Services (pricing as of December 1, 2023)
Snafu with Optimum Support
Of course, I can’t forget to mention that in May 2023, Optimum inexplicably disabled my internet service for a whole day without a clear explanation.
When I contacted multiple tech support departments, all kept on saying “someone seems to be trying to hack into your router so we turned off the service” excuse and asking me to their “security department” which was closed.
Will I go back to Optimum? Maybe, but I first need to forget about that incident.
In summary, Optimum Online offers a viable internet service option, especially for those in its service areas seeking a balance between speed, availability, and cost. While it may not match the high-speed capabilities of fiber-optic services like Verizon FiOS, its HFC network provides a competitive alternative. As technological advancements continue in the realm of internet services, Optimum’s ability to adapt and upgrade its network will be crucial in maintaining its position in the market.
Setup
From the street, I have two fiber cables connected to my house in the garage. The following coaxial/ethernets terminate near this location:
Coaxial 1 (master bedroom)
Coaxial 2 (second floor office)
Coaxial 3 (first floor den)
Coaxial 4 (first floor living room)
Coaxial 5 (basement)
Coaxial 6 (basement)
Cat5 Ethernet 1 (basement)
Cat5 Ethernet 2 (first floor den)
These wires were installed over a period of 2 years when I was remodeling the interior of my house.
Having pre-positioned cables and wires mean that I can simply disconnect and reconnect to either Verizon FIOS and Optimum Online routers at a moments notice.
Optimum Online setup
Verizon FIOS setup
Wrapping Up
I will update this post with actual pictures when I get some free time in the near future. Hope this will make it easy for you to take advantage of FIOS/Optimum Online offers for new customers!
If you have any questions about my particular setup, leave a comment below.
HostGator and Cloudways are both web hosting providers, but they cater to different segments of the market and offer distinct types of hosting services. Here’s a classification based on their primary features and target audiences:
HostGator
Type: Traditional Shared Hosting ProviderTarget Audience: Ideal for beginners, small businesses, bloggers, and those who require simple web hosting solutions.Services Offered:
Shared Hosting: Affordable, user-friendly, and suitable for small websites.VPS Hosting: Offers more control and resources than shared hosting.Dedicated Hosting: For high-traffic websites requiring dedicated resources.
Key Features:
User-Friendly: Known for its ease of use, making it a good choice for those new to web hosting.Pricing: Generally more affordable, especially for shared hosting plans.cPanel: Provides a standard cPanel for website management.
Support and Reliability: Known for decent customer support and uptime guarantees, though it might not match the highest standards set by more premium providers.
Cloudways
Type: Managed Cloud Hosting PlatformTarget Audience: Suitable for developers, medium to large businesses, and those who need scalable, high-performance hosting solutions.Services Offered:
Managed Cloud Hosting: Provides management services on top of cloud infrastructures like DigitalOcean, AWS, Google Cloud, etc.
Key Features:
Performance and Scalability: Offers robust performance and easy scalability, catering to growing websites and applications.Advanced Features: Includes features more suited to technical users, like staging environments and Git integration.No cPanel: Uses its own custom control panel designed for managing cloud hosting environments.
Support and Reliability: Provides stronger support for technical issues and higher reliability, suitable for more demanding websites.
Comparison Summary
Use Case: HostGator is more beginner-friendly and suited for standard web hosting needs, while Cloudways is geared towards users who require the scalability and performance of cloud hosting.Technical Requirement: HostGator is less technical and more plug-and-play, whereas Cloudways offers more advanced features that appeal to users with technical know-how.Pricing Model: HostGator generally offers lower pricing, particularly for entry-level hosting, while Cloudways’ pricing reflects its advanced, scalable cloud hosting solutions.
In summary, the choice between HostGator and Cloudways should be based on the user’s technical proficiency, scalability needs, and the specific requirements of their website or application.