Key Points
- In order to access storage devices, Windows Operating System (7, 10, 11) assigns a unique signature to each storage devices
- When there is a conflict with drive letter assignments or signature collisions, one or more internal or external drive may be invisible to the operating system
- This post will provide you with a detailed step-by-step instructions on how to resolve this issue
Problem
I own two, 1 TB external, portable hard drives made by Western Digital (“My Passport Essential SE”):
- WDBACX0010BBL-01: My Passport SE, 5600 RPM, USB3, Blue
- WDBACX0010BBL-01: My Passport SE, 5600 RPM, USB3, Silver
When I plugged both drives at the same time using two separate USB cables, Window 10’s FILE MANAGER was only able to see the drive that was plugged in first (in my case, the blue drive).
The second “invisible” (silver) My Passport drive was not even detected in the DISK MANAGEMENT TOOL.

This invisible drive issue can also happen if you clone a drive with a different brand/model.
- Only one external hard drive shows when two are connected
- Disk offline because it has signature collision with another disk online
- windows 10 external hdd signature collision
- windows 10 two external hdd cannot access one drive
- why can’t I see my second hard drive in Windows 10
- Why is only one of my hard drives not showing up?
Possible Causes
There are three primary reasons why one of the drive cannot be seen by the operating system:
- Defective drive and/or USB cable
- Conflict with drive letter assignments – drives are not visible in FILE MANAGER
- Conflict with signatures – drives are not visible in DISK MANAGEMENT TOOL
| Disk Management Tool |
|---|
| Windows 7, 10, 11 Disk Management tool (DMT) allows users to manage and organize storage devices by assigning a unique name or ID to them. DMT offers basic functions such as creating, formatting, deleting partitions as well as offer more advanced capabilities like extending and shrinking partitions. You can access DMT by right-clicking on the four-pane Windows Start in the system tray and selecting “Disk Management” from the popup menu. You can learn more about it from here (external link to Microsoft). |
Troubleshooting a defective drive and/or USB cable
Before diving into more complex solutions, we want to verify that both portable storage devices, USB cables, and USB ports are in good working order.
First, simply plug in your external hard drives individually to make sure that each drive can be accessed by the FILE MANAGER.
If your desktop or laptop has three USB ports, try attaching each portable drives to all ports.
Lastly, you should swap the USB cables between two drives when plugging them into your computer.
While viewing the content of your drives in FILE MANAGER, make a note of the drive letters. If you see that both drives have the same drive letter (in my case, drive letter “G” was assigned to both blue and silver drives), we will need to change the drive letter on one drive.
If your drives can be accessed by your computer, you can move on to the next troubleshooting step.
Changing the Drive Letter Assignment
With both external drives plugged in, if your one of your drive is not listed in the DISK MANAGEMENT TOOL, there is a conflict with the driver letter assignment.
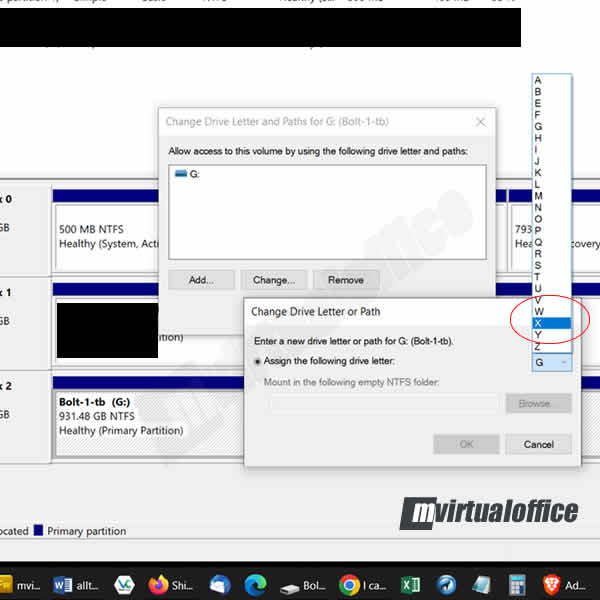
As stated previously, I had erroneously assigned the letter “G” to both drives so we need to change the drive letter on one of the external drives:
- STEP 1: Plug in one external drive only (in my case, a blue My Passport drive)
- STEP 2: From the desktop, right click on the Window icon (bottom left), then click DISK MANAGEMENT
- STEP 3: Right click on the external HDD (in my case, Disk 2, Bolt-1-tb), then click on CHANGE DRIVE LETTER AND PATHS
- STEP 4: Change the drive letter to whatever you want (in my case, drive letter X). You may be prompted with a message “Some programs that rely on drive letters might not run correctly. Do you want to continue?“. Although changing a drive letter does not impact the content, some of your applications that need to re-map to your drive with the new drive letter assignment. Click YES to proceed.
- STEP 5: Look at the DISK MANAGEMENT dashboard and confirm that the drive letter has been changed from G: to X:
- STEP 6: Plug in your second My Passport external HDD (in my case, a silver My Passport)
- STEP 7: Your DISK MANAGEMENT should now list this second drive, but the drive is still missing a letter and thus cannot be accessed just yet. If you click on the exclamation with a blue circle, you will see the error message “The disk is offline because it has a signature collision with another disk that is online”
Fixing Signature Collision
Each disk (internal and external) gets a unique “name” (a.k.a. identifier or signature) during the initialization so that Microsoft Windows can differentiate between multiple storage devices.
When two or more devices have the same name, the OS gets confused and only identifies the FIRST DRIVE you plug in and blocks access to subsequent storage drives with the same identifier.
You can use two methods to fix this problem:
- Option A – DISKPART
- Built-in Microsoft tool
- Clean and change the identifier via UNIQUEID command on a target drive
- Option B – HEX editor
- Change the identifier stored in the 0 sector in the Master Boot Record (MBR)
- You can also use DM Disk Editor (DMDE), which is free, to make these changes
I will show you how to fix the “Disk offline because it has signature collision with another disk online” issue using the DISKPART tool.
How to Change the UNIQUE ID
We will need to use a command prompt tool (CMD) to change the UNIQUE ID for the second drive.
| Two things to be aware: |
|---|
| (1) You need to be the administrator for your computer (2) Although changing UNIQUE ID should not impact accessing your data, it is always a good idea to perform a backup before making this change. |
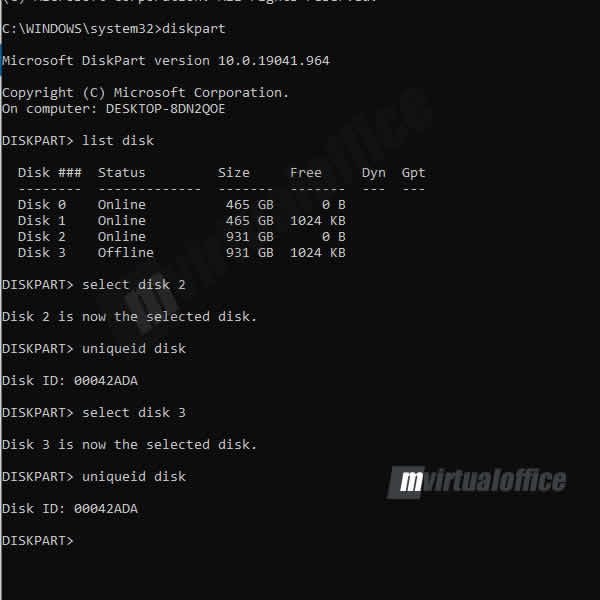
- STEP 1: From the desktop, right click on the Window icon (bottom left), then click COMMAND PROMPT (ADMIN)
- STEP 2: Type diskpart then hit the enter key
- STEP 3: Type list disk then hit the enter key
- STEP 4: Type select disk 2 the hit the enter key (this step will select my BLUE external drive)
- STEP 5: Type uniqueid disk the hit the enter key; the UNIQUE ID for my BLUE drive is 00042ADA
- STEP 6: Type select disk 3 then hit the enter key (this step will select my SILVER external drive)
- STEP 7: Type uniqueid disk the hit the enter key; ; the UNIQUE ID for my SILVER drive is 00042ADA
- STEP 8: Since we confirmed that both BLUE and SILVER drives have the same UNIQUE ID, I will be change the value for the SILVER DRIVE
- STEP 9: Type select disk 3 then hit the enter key
- STEP 10: Type uniqueid disk id=00042add (this new value has to be in hexidecimal form so the easiest way is the change the last letter to 0,1,2,3,4,5,6,7,8,9, A,B,C,D,E, or F)
- STEP 11: Type uniqueid disk the hit the enter key to verify that the new UNIQUE ID is now 00042add
- STEP 12: Type online disk to bring up the drive online
Take Aways
Now that both blue and silver external drives have their own unique ID (name or signature), I am able to access both drives at the same time (as shown in the FILE MANAGER screen capture).
Remember that this problem also occurs if you clone a drive.
I hope you found this post to be helpful. If liked the post, please leave a comment below. Thanks!


