Free
- CodeHS – link, free and paid
- freecodecamp
- Khan Academy
- LinkedIN Learning – via local library
Paid
- Treehouse
- Code Combat
- Sitepoint – link, $72 for Premium
- Code Avengers
- code academy
Monumetric
Ezoic
Clickio.com
Playwire.com
Adthrive.com
Mediavine
Freestar
Monetizemore
Adpushup
App Testing
Browser Testing
Reference Links
Intezer.com – upload files to analyze malware signature (free)
Systernals (Microsoft-owned) – Analytze Windows processes (Systernals Suite)
Trend Micro – Anti Malware Tools for Home Users (Trend Micro)
Microsoft CMD.EXE (Run as Admin) – netstat shows you list of applications and what they are listing (use triggers -b -o for more info)

Drop cap is simple enlarging the first letter of a body of text to draw readers attention. It is a very popular effect used in magazines and newspapers as well as online content because it is attractive and effective.
There are many different ways of accomplishing this task but the most effective way I found was through the use of a CSS stylesheet.
You may be aware that CSS stylesheet is allows design information to be stored in one location to make it easier to make broad changes (i.e. font size, font type, color, etc.)
So I started looking around and there were some very good suggestions (see below in the resource section), but I just could not make any of them to work in my particular situation so I decided to outline how I did it. Hope it will work for you as well 😉
In general, I do NOT like installing WordPress plugins for two reasons:
So here is how I used CSS declarations to utilize dropcaps:
Step 1 – I use Hostgator so I logged in, then opened up a file manager
Step 2 – Navigated to where the style.css was located within the magazine child theme folder;
Step 3 – Opened it for editing
Step 4 – opened another Firefox window and downloaded Eka Kurniawan’s plugin (see below for the link)
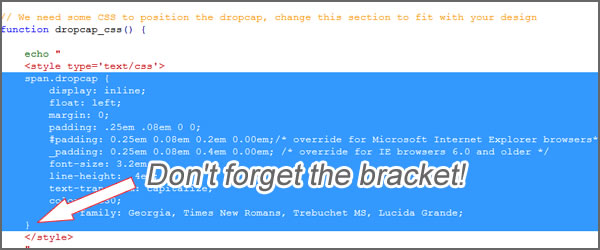
Step 5 – Open the dropcap-shortcode.php in your text editor and copy the highlighted text
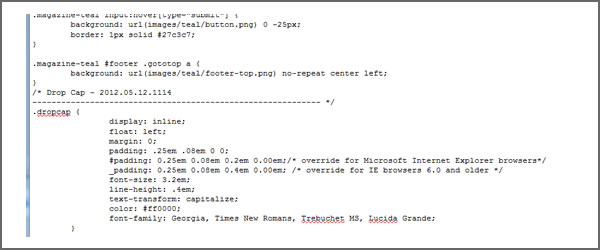
 (here is the actual code)
span.dropcap {
display: inline;
float: left;
margin: 0;
padding: .25em .08em 0 0;
#padding: 0.25em 0.08em 0.2em 0.00em;/* override for Microsoft Internet Explorer browsers*/
_padding: 0.25em 0.08em 0.4em 0.00em; /* override for IE browsers 6.0 and older */
font-size: 3.2em;
line-height: .4em;
text-transform: capitalize;
color: #c30;
font-family: Georgia, Times New Romans, Trebuchet MS, Lucida Grande;
}
Step 6 – Switching to the FF window containing the Genesis – Magazine STYLE.CSS, past the code to the end;
 Step 7 – Go to you page or post and simply use <span class=”dropcode”> </span> HTML tags to make your first letter a drop cap. That’s it!
Greg Rikaby – http://gregrickaby.com/2011/04/how-to-create-drop-caps-in-thesis-and-genesis.html
Binary Turf – http://www.binaryturf.com/code-auto-dropcap-thesis-wordpress-themes/
Eka Kurniawan – http://wordpress.org/extend/plugins/drop-cap-shortcode/
I needed some additional screen real estate to efficiently handle coding / graphics design work so I decided to purchase an external monitor for my HP Elitebook 8560w Workstation Notebook (without a docking station)).
I ultimately decided to purchase HP zr2740w 27″ LED monitor over Dell Ultra Sharp 27″, Apple Cinema Display 27″ and HP’s own 2711x because:
I purchased the monitor directly from HP Direct because:
Yes, I could have avoided paying sales tax by purchasing from an online retailer but HP offered 30 day satisfaction guarantee. On top of that, if you made a purchase with an Amex OPEN credit card, you could receive up to 10% cash rebate (5% for purchases less than $1,000; 10% for $1,000 or higher purchase) from American Express.
Anyway, my excitement quickly turned sour when I hooked it up to my HP Elitebook 8560w workstation notebook (XU083UT#ABA) via the DisplayPort cable (included with the monitor). All I could see was a (lighted) empty screen and no matter how much I tried tweaking the Windows 7 Professional display configuration, the external screen did not display any data. After 30 minutes of frustration, I finally called the HP Small Business tech support (800.334.5144).
He made me go through the usual battery of questions to triage the problem:
1. What is the notebook configuration (Model XU083UT#ABA, BIOS f.20, 16 GB memory, ATI m5950 1GB v.ersion 8.850.7.3000 – 20111116
2. Is the master power switch on (in addition to the soft power on/off switch in front of the monitor, there is a physical on/off switch where the power cord gets plugged in)?
3. Is the DisplayPort cable HP OEM part (there are some incompatibility issues with third-party DP cables) and tightly plugged in?
4. Reset the BIOS to factory default
5. Try using a DVI or VGA cords (could not try DVI because my notebook does not come with one; could not try VGA because the monitor does NOT come with a VGA port!)?
6. Run scanning tools from here (http://www.hp.com/go/ispe) using the Internet Explorer (the scan did not work; app got stuck and got nowhere);
7. Reset the monitor to factory configuration by unplugging the monitor from power, then hold the power button for 60sec while plugging in the power cord.
When I mentioned that googling “HP Elitebook 8560w zr2740w problem” produced results with people who are having same problems (with questions being posted at hp forums to boot with HP engineers providing a beta display driver!), the tech agent told me he would escalate my case to a level 2 support agent.
An hour later, a level 2 agent sent me an email with an ftp link to SP56103.exe file with the caveat that it is in BETA and that a final driver will be published at the end of March 2012.
When I was waiting, I found the newest AMD Catalyst Control Center (CCC) software (v.3.00.0851) here and got my monitor to work (you may encounter some installation error messages; just ignore them and reboot) so I did not try the SP56103 driver. I will uninstall my latest CCC app and install the final driver from HP later.
Now that the monitor is working (FHD or 1920×1080 on my notebook and 2560×1440 WQHD on my external monitor), I can get some serious work done!
DIY Thesis Theme for WordPress is an awesome framework for WordPress that provides excellent web site customization flexibilities. One cool feature allows users to modify custom.css and custom_functions.php files via text editor that gives almost limitless possibilities in terms of design and functionality. Although there are number of other excellent fram
But the ease of which a user can make changes to these two files can be a double-edged sword. Especially if one makes a single typo in the custom_functions.php file which can instantly disable the entire sit. Furthermore, if a person makes a change that causes a fatal error, the user may not be able to correct it using the WordPress application.
In this post, I will outline detailed steps to minimize the risk and what to do about it should you encounter that problem.
Because there are many variations between hosting providers and graphical user interfaces, I am going to assume the following:
Step 1: Login to your host via cPanel (fig 2.1)
Step 2: Click on the File Manager icon (fig 2.2)
Step 3: If you have multiple domains associated with your cpanel, choose the appropriate domain (fig.2.3). By the way, you will note that by “GO” button is grayed out. That is because my account access timed out when I took this screenshot. Simply log out and log back in and you will be able to click on the “GO” button.
Step 4: Navigate to this path (“public_html/mvirtualoffice.com/wp-content/themes/thesis_18/custom“). Please note that cPanel file manager works slightly different than that of Windows Explorer. To drill down the file directory, you need to click on the folder icon (fig.3.1.A). Clicking on the file or directory name allows you to change the name of that file/directory (fig.3.1.B).
Step 5: Create a backup directory called backup-20120204 by first clicking on the New Folder icon (fig.3.2.A) then completing the name field (fig.3.2.B). Because I frequently change my custom_functions.php and custom.css files, I use a date (yyymmdd) format for my own tracking needs but obviously you can choose any naming convention to suit your needs
Step 6: While holding down the CTRL button, click on the custom.css and custom_functions.php files (fig.3.3). While still holding the CTRL button, drag the highlighted files into the newly created backup directory.
Please note that dragging and dropping the highlighted files while pressing down the CTRL performs a COPY function. If you were to do this step without pressing down the CTRL key will instead perform a MOVE function.
There are two ways to modify a custom_functions.php file. You can do it directly through cPanel or DIYtheme. I chose DIYtheme route because it is faster to make rapid, on-the-fly changes.
Step 1: Log into WordPress
Step 2: Click on the Thesis link to expand the drop down list
Step 3: Click on the Custom File Editor
Step 4: Select custom_functions.php from the drop down menu and click edit
There are two possiblescenarios:
Scenario 1: File is corrupted but you can still access the WordPress-DIYtheme application
Scenario 2: File is corrupted and you CANNOT access the website,Wordpres or DIYtheme application
For scenario 1, fixing it is quite easy. Just open custom_functions.php version prior to the broken one in notepad, copy and paste via DIYtheme’s Custom File Editor.
For scenario 2, involving a fatal error where you are unable to access the front end (website/WordPress/DIYtheme), you need to log in using your cPanel credential and either copy & paste using cPanel’s editor, or just upload the custom_functions.php text file version that is working.
Thanks for reading!
I have been using Ubuntu 11.04 Natty Narwhal for awhile so I was able to find what I needed quickly, including my trusty command line interface application called terminal.
After upgrading to Ubuntu 11.10, I just couldn’t figure out where the terminal app was located. After searching around a bit, I finally found it by clicking on the Ubuntu logo and typing in “terminal” in the search box. Little bit clunky like how Windows Vista arbitrarily moved around applications from Windows XP (thank goodness Vista was retired though!)
 |
 |
 |
Microsoft Visio 2010 is an excellent tool to draw various objects, including network schematics.
However, my Visio 2010 under Microsoft Windows 7 Ultimate (64 bit) kept crashing
Same here, remove the add on.
In Visio select File/Options/Add-Ins/
Manage COM Add-Ins/Click Go
Select ‘Send to Bluetooth’
Click Remove
Yeah finally this worked for me Tools -> Trust Center -> Add-ins-> Check “Disable all aplication Add-ins”.