To print the page count, power on the printer, hold down the green GO button for 2 seconds then let go.
The green indicator light will blink then print a page.
To print the page count, power on the printer, hold down the green GO button for 2 seconds then let go.
The green indicator light will blink then print a page.
The HP Slimline 450-a114 Computer takes the DDR3 PC3-12800 1600MHz SODIMM memory type, and comes installed with 4GB memory.
You can upgrade your HP Slimline 450-a114 Computer to up to a maximum memory capacity of 8GB Memory. Please remember that the first memory module must be installed in to black slot (the second slot is white)
The Computer has 2 Slots to install memory, already with 4GB standard memory installed. For best Slimline 450-a114 Computer performance use the maximum amount of 8GB, fill all the slots with the max allowed memory per slot for your Computer.


I’ve used GoDaddy for over 20 years but their price is simply no longer competitive.
The process is straight forward:
GoDaddy is one of the slowest registrars when it comes to domain transfers. Expect to take about 5 business days to complete the process.
I’ve used Cloudways for a very long time, but with recent Google HCU update screwing up my website traffic, I cannot justify the expense for one of my sites.
So I decided to move one site from Cloudways to MDD hosting. Since I did not have time to muck around myself, I asked MDD hosting technician to move my site, which required giving him access to my Cloudways account.
Since I have multiple servers running under my single email address, I needed to temporarily move the website off my central account into a new account.
This is how you do it:
NOTE:
You do not have to create a new server, but if you accidently created it, you can always delete it.
If you maintain a website utilizing a self-hosted WordPress setup and have Cloudflare CDN and LiteSpeed Cache plugin, you will want to read this post.
When managing a WordPress website with dyamic content, optimizing page load times is crucial for user experience and SEO. The caching settings in Cloudflare play a significant role in this optimization, particularly for sites using WordPress with plugins like LiteSpeed Cache and integrating Cloudflare for additional performance and security benefits.
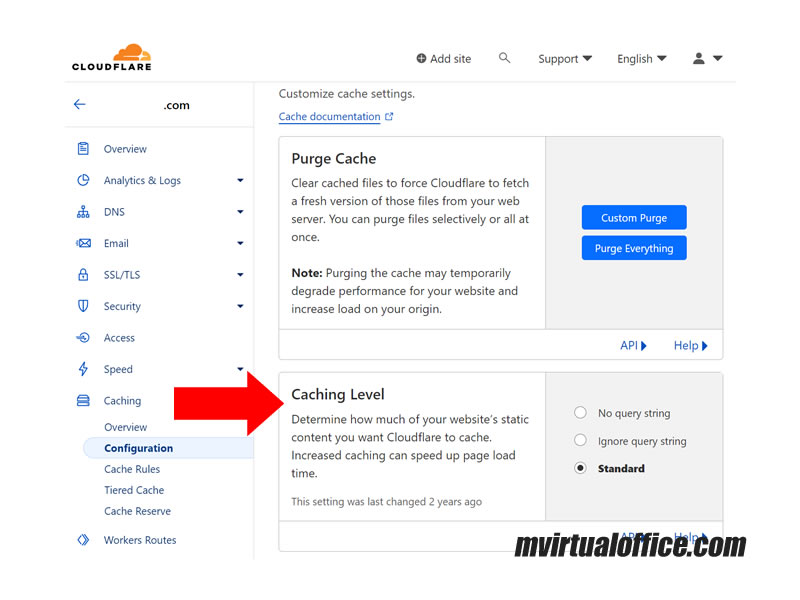
A notable feature within Cloudflare’s settings is the “Caching Level,” aimed at managing the extent of static content caching on your website. Enhanced caching can significantly improve page load times. There are three settings available for this feature:
Let’s review which are essential for understanding how your website gets cached and served to your visitors.
This option tells Cloudflare to cache your website’s static content (like images, CSS, and JavaScript files) but only for URLs without any query strings. A query string is a part of a URL that comes after a question mark (?) and is used to pass additional parameters. For example, https://example.com/photo.jpg?width=300 has a query string that specifies the width of an image.
It’s most useful for sites where the content of the static files does not change based on query strings. If your baseball site’s static resources don’t vary with different query parameters, this setting can help cache more aggressively.
With this setting, Cloudflare caches the static content without considering the query strings at all. This means that a request for https://example.com/photo.jpg?width=300 is treated the same as a request for https://example.com/photo.jpg. Cloudflare serves the same cached content for both URLs.
This option is suitable if your website’s response for a static file doesn’t depend on the query string parameters. For instance, if the image’s width on your baseball site is controlled by CSS rather than the query string, this option could reduce the number of cache misses and speed up the delivery of content.
This is the default setting and a middle ground between the two extremes. Cloudflare will cache static content based on the combination of the URL and the query string. Different query strings will result in different cached versions of the same URL.
This option is ideal for websites where the content might change based on query string parameters. For a baseball site, if you have dynamic content that changes based on query parameters (like sorting order of player statistics), this setting ensures that users see the correct version of your content.
When integrating Cloudflare with the LiteSpeed Cache plugin for a WordPress site, ensuring compatibility and optimizing the settings for both services are essential to maximize your website’s performance and SEO.
Here are specific settings and considerations to keep in mind to ensure Cloudflare and LiteSpeed work harmoniously:
Both Cloudflare and LiteSpeed allow you to exclude specific URLs or types of content from being cached. It’s important to harmonize these settings to avoid caching dynamic content that should be served fresh (e.g., user profiles or custom responses based on cookies).
If you’re using Cloudflare as a CDN, ensure that the LiteSpeed Cache settings are correctly configured to acknowledge Cloudflare’s presence. This often means disabling CDN features within LiteSpeed to prevent conflicts or double caching issues.
LiteSpeed offers various optimization features (such as image optimization, CSS/JS minification, and lazy loading). When these features are enabled in LiteSpeed, ensure that similar settings are not redundantly enabled in Cloudflare, as this can lead to issues such as broken pages or styles.
Both Cloudflare and LiteSpeed allow you to set Browser Cache TTL (Time To Live), which controls how long the content is cached in the visitor’s browser. Make sure these settings are aligned to prevent caching issues or stale content.
If you’re using LiteSpeed’s feature to serve WebP images for supported browsers, ensure Cloudflare’s “Polish” feature (if used) is configured to respect WebP versions or to avoid converting images that have already been optimized by LiteSpeed.
LiteSpeed’s Edge Cache feature can serve content directly from the edge server network. If you’re using Cloudflare, ensure that the configurations between Cloudflare’s caching and LiteSpeed’s Edge Caching do not conflict, especially regarding cache purging and TTL settings.
After configuring both Cloudflare and LiteSpeed Cache settings, it’s crucial to test your website’s performance and monitor for any issues. Tools like GTmetrix, Google PageSpeed Insights, or Cloudflare’s analytics can provide insights into how effectively your content is being cached and delivered.
Both LiteSpeed and Cloudflare offer extensive documentation and support forums. If you encounter specific issues or need advice on settings, referring to the official documentation or reaching out to support can provide tailored advice for your website’s configuration.
By paying attention to these settings and considerations, you can ensure that Cloudflare and LiteSpeed Cache work together efficiently, improving your WordPress site’s speed, performance, and SEO.
When it comes to Cloudflare’s caching level, the standard setting is generally the safest choice, ensuring dynamic content changes are respected while still benefiting from caching.
If you’re certain that your site’s static content doesn’t vary with query parameters, or if such variations don’t impact user experience, Ignore Query String could potentially increase cache hits and performance.
No Query String is less commonly used for dynamic sites but could be relevant in specific scenarios where query strings are entirely irrelevant for static resources.
When using Cloudflare in conjunction with other caching mechanisms (like LiteSpeed Cache), ensure your settings are harmonized across platforms to prevent caching conflicts that might affect your site’s performance or behavior. It’s also important to monitor your site’s performance and adjust these settings as necessary to find the optimal configuration for your specific needs and traffic patterns.
In the ever-evolving landscape of search engine optimization (SEO), the dialogue between technology creators and users plays a pivotal role in shaping the tools and practices that become the standard. Recently, a fascinating discussion unfolded on a public forum, shedding light on the integration and efficacy of IndexNow in SEO practices, particularly in relation to the SEO Framework plugin. This post aims to distill the essence of that conversation, offering a nuanced perspective on the future of SEO tools and protocols.
The IndexNow protocol, introduced by Microsoft Bing and Yandex, is a significant advancement in the realm of search engine optimization (SEO) and web content indexing. This new protocol offers website owners a direct channel to notify search engines about updates, additions, or deletions to their website content, streamlining the process of getting content indexed. With the traditional method, it could take days or even weeks for search engines to discover and index new content, potentially impacting traffic and sales. IndexNow addresses this issue by providing immediate notification to search engines, thereby ensuring quicker content reflection in search results????.
IndexNow operates on a simple yet effective principle: by submitting a URL update to one participating search engine, the information is shared with all other search engines that have adopted the protocol. This not only saves effort but also contributes to a more open and efficient Internet. For developers, adopting IndexNow is straightforward, involving the generation of a key, hosting it on the website, and submitting URLs through a simple HTTP request. Non-developers, on the other hand, can benefit from IndexNow through its integration with popular platforms and content management systems (CMS) like WordPress, Wix, and Duda, among others??.
The protocol has garnered support from several major search engines besides Bing and Yandex, such as Naver, Seznam.cz, and Yep, with Google also testing IndexNow for potential benefits in sustainability and efficiency. Google, known for its efficient crawling mechanisms and use of HTTP/2 for over half of its crawls, is evaluating IndexNow with a focus on enhancing the sustainability of its web crawling efforts??????.
A sitemap.xml is a crucial tool for SEO, essentially acting as a map for search engines to find and understand the structure of your website. It’s especially important for ensuring that all your pages have the chance to appear in search engine results. Without a sitemap, search engines rely on links within your site or from other sites to discover your content, which can be inefficient and lead to missing pages??.
Creating a sitemap.xml involves listing your website’s URLs along with additional information like when the page was last modified (lastmod), how often the page is likely to change (changefreq), and the priority of the page on your site. These elements help search engines crawl your site more intelligently, although it’s worth noting that not all search engines, including Google, use the changefreq and priority information??.
If your website platform doesn’t automatically generate a sitemap for you, there are numerous sitemap generator tools available. Once you’ve created your sitemap, you should submit it to Google via Google Search Console to ensure it’s crawled. This submission process helps Google discover new pages faster, re-crawl changed pages more quickly, and helps you monitor the index status of your pages????.
For larger websites, or if your sitemap exceeds the limits of 50MB in size or 50,000 URLs, you may need to create multiple sitemaps and then compile them into a sitemap index. This index acts as a sitemap for your sitemaps, helping keep everything organized and accessible for search engines??.
In terms of optimization, it’s important that your sitemap only includes URLs that you want indexed, ensuring they return a 200 status code, are fully qualified and absolute, and are canonical URLs. Additionally, your sitemap itself should be UTF-8 encoded, not exceed the size and URL limits, and correctly specify the namespace to follow standards set by sitemaps.org??.
Lastly, remember to check your sitemap regularly using tools like Google Search Console’s Sitemap Report to identify and fix any indexing issues, such as duplicate content or pages that exceed your site’s crawl budget. Aligning your sitemap and robots.txt file is also crucial to avoid sending mixed signals to Google about which pages are important??.
The emerging trend of being encouraged or even pressured to switch to the IndexNow protocol marks a significant shift in how websites communicate changes to search engines. Proponents argue that IndexNow, with its ability to instantly notify search engines about content updates, deletions, or new additions, represents a leap towards more efficient internet crawling and indexing. This efficiency could translate into fresher search results and potentially better visibility for website content.
However, there are notable cons to consider. The transition to IndexNow demands technical adaptation and potentially, for some, a steep learning curve. Not all search engines have adopted the protocol, which could mean that its benefits are not universally felt across all search platforms. There’s also a concern about the potential for misuse or spam, as the immediate indexing could be exploited to push low-quality content.
Furthermore, the shift underscores a broader issue within SEO and web development communities: the reliance on a few major tech companies to dictate standards and practices. While IndexNow promises benefits, its adoption hinges on broader support from the web community and the balancing of its advantages against potential drawbacks.
Sybre Waaijer, a key figure behind the SEO Framework plugin, shared valuable insights into the plugin’s compatibility with IndexNow. Waaijer elucidated the plugin’s strategic direction, revealing a commitment to incorporating IndexNow, either directly or as an extension. This move, according to Waaijer, is in response to the evolving demands of search engine protocols and the SEO community’s feedback. Interestingly, the update will also see the deprecation of traditional pinging functionalities for Bing and Google, signifying a shift towards more autonomous search engine operations.
Fabrice Canel, representing a significant tenure at Microsoft and Bing, brought clarity to the discussion by comparing the functionalities and limitations of sitemaps and IndexNow. Canel highlighted the inherent limitations of sitemaps, such as their inability to offer real-time notifications and their weak delete signals. In contrast, IndexNow promises a secure, real-time notification process for content updates, a feature increasingly demanded by modern search users. This open protocol, Canel notes, fosters a collaborative environment among participating search engines, enhancing the efficiency and reach of content indexing.
Yet, Waaijer raised pertinent questions regarding the real-world application and benefits of IndexNow over traditional sitemaps. While acknowledging the theoretical advantages of IndexNow, Waaijer pointed out the practical effectiveness of sitemaps in indexing until recent shifts aimed at promoting IndexNow’s adoption. The discussion touched on the nuanced realities of SEO practices, where real-time indexing does not necessarily translate to real-time ranking improvements. Moreover, Waaijer critically assessed the priorities driving the adoption of new SEO protocols, suggesting a balanced approach that considers both technological advancements and the practical needs of SEO practitioners.
The dialogue between Waaijer and Canel exemplifies the critical conversations shaping the future of SEO. As tools and protocols evolve, the collective insights and experiences of industry experts and practitioners will continue to be invaluable in navigating the complexities of search engine optimization. This post, drawing from the rich discussion between two prominent figures in the SEO community, offers a glimpse into the ongoing evolution of SEO practices, highlighting the importance of adaptability, collaboration, and critical inquiry in the pursuit of effective and efficient SEO strategies.
The adoption of IndexNow signifies a paradigm shift in how content is indexed on the Internet, promising faster indexing times, reduced crawl loads for websites, and more timely delivery of updated content to users. This initiative reflects a collaborative effort towards creating a more efficient and sustainable web ecosystem, benefiting both webmasters and users alike??????.
For more detailed insights and technical guidelines on how to implement IndexNow for your website, visiting the official IndexNow documentation and resources provided by Microsoft Bing and Yandex is highly recommended??????.
To permanently redirect all traffic from your site to another site’s page using the .htaccess file, you can use the following rule:

RewriteEngine on
RewriteRule ^(.*)$ http://www.example.com/$1 [R=301,L]
Replace http://www.example.com/ with the URL of the page you want to redirect all your traffic to. This rule uses a 301 redirect, which is understood by browsers and search engines as a permanent redirect. This means that the redirection will also be cached by browsers and recognized by search engines, transferring the SEO value of your pages to the new URL.
Here’s a breakdown of the rule:
RewriteEngine on: Enables the rewrite capabilities.RewriteRule ^(.*)$ http://www.example.com/$1 [R=301,L]: This rule matches any request (^(.*)$) and redirects it to http://www.example.com/ while preserving the rest of the URL path. The [R=301,L] flags indicate that it is a permanent redirect (301) and that this rule should be the last (L) rule considered if it matches.Remember to replace http://www.example.com/ with the actual URL you wish to redirect to.
In most cases, you will have to insert this code to the existing htaccess file that looks something like this:
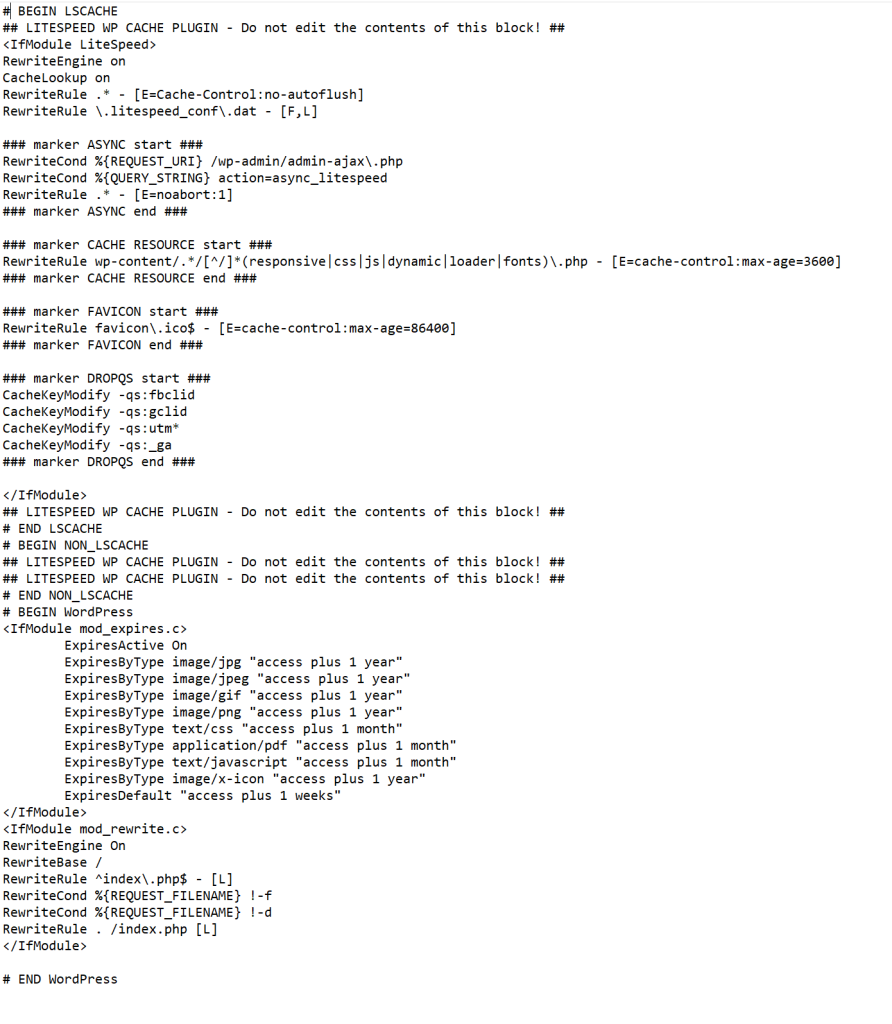
If you have never worked with htaccess before, you might be tempted to shove the new code at the beginning or at the end.
To add a new section for permanently redirecting all links to another site’s page in your existing .htaccess file, you should carefully place it in a location that doesn’t interfere with the existing rules, especially those managing caching and WordPress’s rewrite rules. A good practice is to add new redirection rules before the # BEGIN WordPress section or after the existing rewrite rules but before the WordPress-specific rules to ensure that the redirection takes precedence over WordPress’s internal handling of URLs.
Given your current .htaccess content, you can insert your new redirection rule just before the # BEGIN WordPress section. This placement ensures that your redirection rule is processed before any WordPress or caching rules that might conflict with the intended redirection behavior.
Here is how you can integrate the new redirection rule:
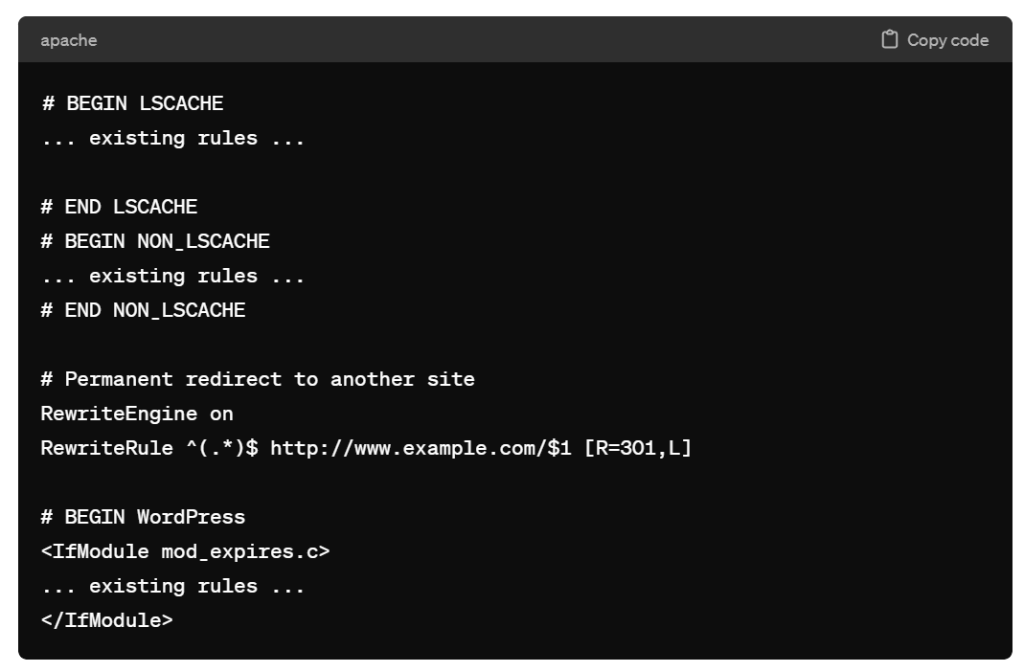
# BEGIN LSCACHE
... existing rules ...

# END LSCACHE
# BEGIN NON_LSCACHE
... existing rules ...
# END NON_LSCACHE

# Permanent redirect to another site
RewriteEngine on
RewriteRule ^(.*)$ http://www.example.com/$1 [R=301,L]

# BEGIN WordPress
<IfModule mod_expires.c>
... existing rules ...
</IfModule>
Remember to replace http://www.example.com/ with the actual URL you want to redirect all your traffic to. Adding the rule in this manner ensures that the server processes the redirect before handling any WordPress-specific routing, thereby avoiding potential conflicts with WordPress or cache-related rules.
What is that “$1” trigger?
The $1 at the end of the URL in the RewriteRule ^(.*)$ http://www.example.com/$1 [R=301,L] serves as a placeholder that captures and appends the original requested path to the new URL. Here’s a breakdown of its function:
^(.*)$ is a regular expression that matches the entire path of the URL requested on your server. The ^ symbol matches the beginning of the URL, and the $ symbol matches the end. .* matches any character (.) zero or more times (*), effectively capturing the entire path of the URL after the domain name.() around .* create a capture group, which means whatever matches inside those parentheses (in this case, the entire path and query string of the original URL) can be referenced later in the rule.$1 references the first (and in this case, the only) capture group defined in the pattern. It’s used in the substitution URL http://www.example.com/$1 to dynamically insert the captured path from the original request into the destination URL.So, if someone visits http://yourdomain.com/page1, the rule will redirect them to http://www.example.com/page1. The $1 ensures that the /page1 part of the original URL is appended to the base URL http://www.example.com/, allowing for a seamless redirect that preserves the path and query components of the original request. This mechanism is essential for maintaining the structure of the original URL in the redirection process.
To redirect all traffic from your site to a specific page, such as https://yourname.com/this-page, you can modify the .htaccess rule accordingly. Given the placement advice and your existing .htaccess content, here’s how you can insert the redirection:
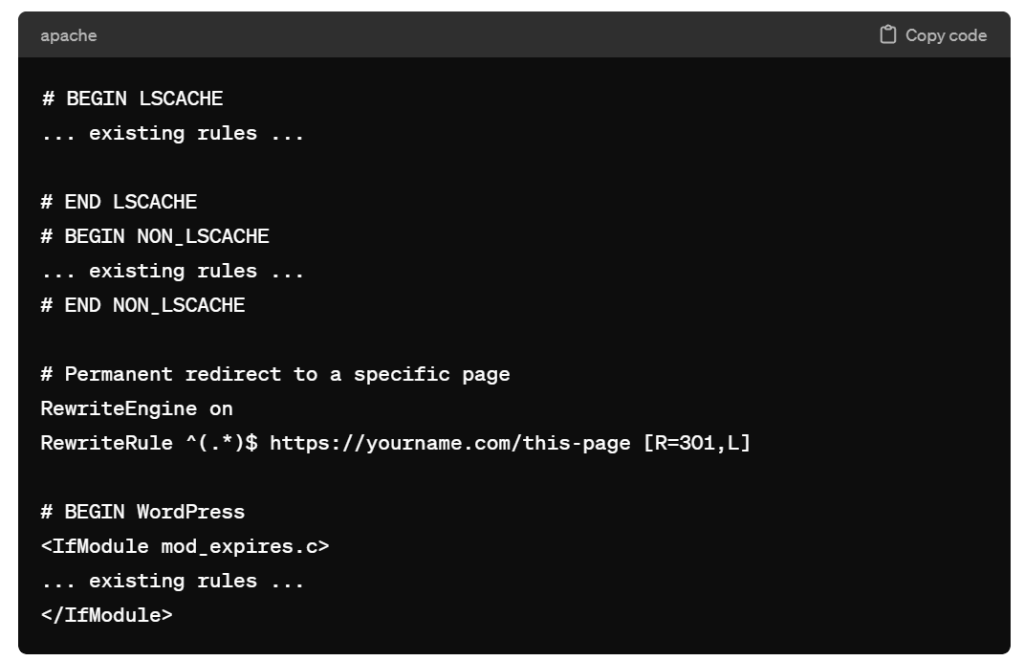
# BEGIN LSCACHE
... existing rules ...

# END LSCACHE
# BEGIN NON_LSCACHE
... existing rules ...
# END NON_LSCACHE

# Permanent redirect to a specific page
RewriteEngine on
RewriteRule ^(.*)$ https://yourname.com/this-page [R=301,L]

# BEGIN WordPress
<IfModule mod_expires.c>
... existing rules ...
</IfModule>
This rule will redirect all requests from your current site to https://yourname.com/this-page. It’s important to note that this will override any specific URL paths or files on your original site, directing everything to the specified page. The [R=301,L] flags indicate that this is a permanent redirect (which search engines will honor by transferring SEO value) and that no subsequent rewrite rules should be processed if this rule is matched.
Final Thoughts
I hope this help you a little bit as you learn how to manage htaccess files.
By the way, make sure to test this configuration in a development environment or at a time when you can afford to troubleshoot, as improper .htaccess configurations can result in site downtime or unexpected behavior.
When you are working in the search engine optimization field, sometimes you need to scan the source page where inbound links are originating from.
In many cases, there is no quick and easy way of scanning a page without digging through HTML.
Instead, there are several free tools and methods available to scan a webpage for specific links or domain names. These tools can be useful for various purposes, including SEO audits, link verification, or competitor analysis. Here are a few approaches you can take:
For more tech-savvy users, writing a small script in languages like Python can provide the most flexibility. Using libraries such as BeautifulSoup for Python, you can create a script that fetches a webpage, parses its HTML, and searches for links containing a specific domain. This method requires some programming knowledge but is highly customizable to your needs.
Here’s a basic example of how you might use Python to find links to a specific domain on a webpage:
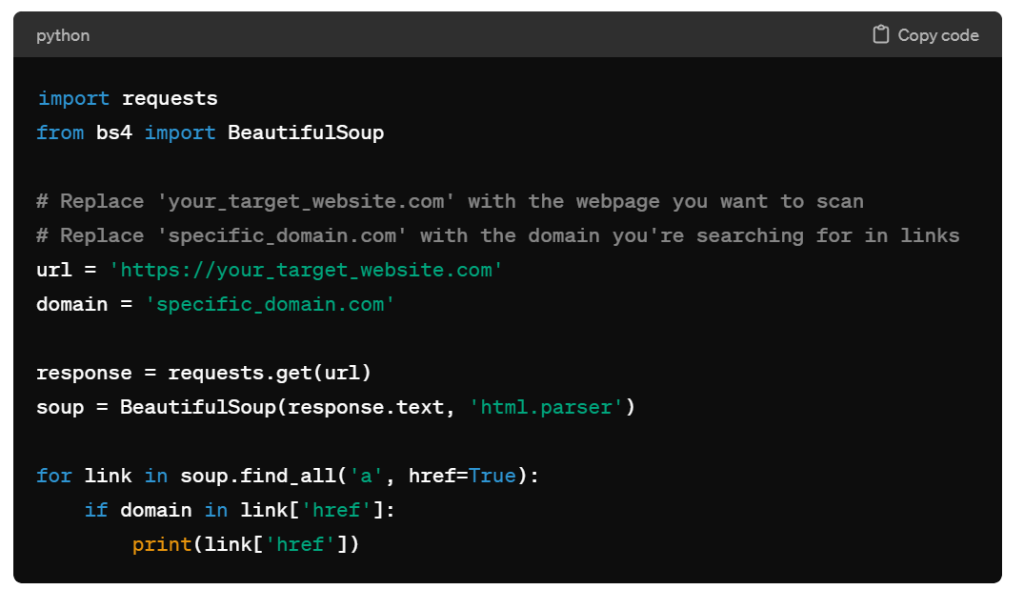
import requests
from bs4 import BeautifulSoup

# Replace 'your_target_website.com' with the webpage you want to scan
# Replace 'specific_domain.com' with the domain you're searching for in links
url = 'https://your_target_website.com'
domain = 'specific_domain.com'

response = requests.get(url)
soup = BeautifulSoup(response.text, 'html.parser')

for link in soup.find_all('a', href=True):
    if domain in link['href']:
        print(link['href'])
This script will print out all links on ‘your_target_website.com’ that include ‘specific_domain.com’. You can adjust the url and domain variables as needed.
Each of these methods has its pros and cons, depending on your specific needs and technical comfort level. Online tools and browser extensions are user-friendly and quick for spot checks, while custom scripts offer more control and flexibility for advanced users or specific requirements.
To prevent your WordPress theme from being detected by sites like “WhatThemeIs” and others, you can take several steps to obscure or hide details about your theme and plugins.
While it’s difficult to make your site completely undetectable without affecting its functionality, you can make it harder for automated tools to identify your theme and plugins.
The following are some methods you can consider.
Minifying and combining your theme’s CSS and JavaScript files can obscure the source of the files, making it harder for detection tools to identify the theme based on file names or specific style and script patterns.
Changing the name of your theme’s folder can help obscure its identity. However, be aware that this might need to be redone after theme updates, and it could potentially cause issues with updates and functionality.
Creating and activating a child theme with a unique name provides an additional layer of obfuscation. The child theme can override the main theme’s files and functions, making it less straightforward to identify the parent theme.
The style.css file in your theme directory contains metadata about the theme, including its name, author, and version. Editing this information can help mask the theme’s identity, but be cautious as it may impact theme updates and support.
Some WordPress security plugins offer features to hide or restrict access to your site’s directories and files, making it harder for automatic detection tools to scan your site for theme and plugin information.
Ensure that directory browsing is disabled on your server to prevent unauthorized users from viewing the contents of your directories, which can include theme and plugin folders.
Some tools also report the WordPress version, which can be hidden by removing the version number from the site’s head section and other areas.
Consider custom developing features that you would otherwise use plugins for. This not only hides their existence but can also optimize your site’s performance.
A web application firewall (WAF) can help block malicious attempts to detect or exploit your site, including automated scans for themes and plugins.
It’s important to note that while these steps can help make it more difficult for automated tools to identify your WordPress theme and plugins, they may not provide complete anonymity.
Moreover, some modifications can affect your site’s functionality, performance, or the ability to receive theme and plugin updates.
Always back up your site before making significant changes and consider the trade-offs between security, privacy, and usability.
Personally, I would recommend that you focus on growing your site rather than spending time trying to hide the identity of your WordPress theme.
When reviewing your Google Search Console –> Page Indexing –> Not found (404) error pages, you may be surprised to see page URLs that you did not create.
One common source of error is that other websites may have incorrectly linked to pages on your site that do not exist. This is common when there’s a typo in the URL or if the linking site uses an outdated URL that has since been removed or changed on your website.
Related to internal linking strategy, there might be broken links within your own site. These could be in your posts, pages, or even in your site’s template or navigation menus.
Sometimes, links are created automatically by WordPress plugins, and if those plugins are misconfigured or outdated, they might generate incorrect URLs.
Search engines like Google use automated bots to crawl the web. These bots sometimes attempt to access URLs based on patterns they’ve detected on your site or elsewhere, leading them to nonexistent pages.
In some cases, a site may have been compromised, and the attacker may have created pages or scripts that generate fake URLs. These URLs can lead to 404 errors when the search engine tries to access them.
Some WordPress plugins or themes might dynamically generate URLs based on user interactions or specific actions. If these URLs get indexed by search engines but are not intended to be standalone pages, they can result in 404 errors.
If you’ve recently migrated your WordPress site or gone through a redesign, some of the old URLs that were indexed by search engines might no longer exist, leading to 404 errors.
Check External Links: Use tools like Google Search Console to find the sources of these links. If they’re coming from external sites, you can try to contact the site owners to correct the links.
Fix Internal Links: Audit your site for any broken internal links. WordPress plugins like “Broken Link Checker” can help identify and fix these.
Implement Redirects: For URLs that have changed or been removed, consider setting up 301 redirects to the correct or new pages. This can be done using WordPress plugins like “Redirection” or by editing your site’s .htaccess file (for Apache servers).
Regularly Update and Secure Your Site: Ensure your WordPress core, themes, and plugins are always up to date. Implement security best practices to reduce the risk of hacking and malware.
Submit Updated Sitemaps: Regularly submit updated XML sitemaps to Google Search Console to help search engines understand the current structure of your site.
Monitor and Manage 404s: Regularly monitor the 404 errors reported in Google Search Console and address them promptly. If certain URLs are generating 404 errors but should not be indexed in the first place, consider using the robots.txt file to prevent search engines from crawling those URLs.
